[研究] Apache CouchDB 1.0.4 文件資料庫 安裝 (CentOS 6.5 x64)
2013-12-30
Apache CouchDB 是一種文件資料庫(Document Database),可以使用JavaScript通過MapReduce方法進行查詢和索引,它提供了一個RESTful JSON API,因此可以在任何環境中通過HTTP訪問,CouchDB內置了Web管理控制台,支持通過瀏覽器管理數據庫。CouchDB使用Erlang編寫,Erlang是一種健壯的函數式編程語言,非常適合於構建並發的分佈式系統,Erlang的設計非常靈活,其可伸縮性與可擴展性都非常棒。
官方網站
http://couchdb.apache.org/
安裝說明
http://wiki.apache.org/couchdb/Installation
http://wiki.apache.org/couchdb/Installing_on_RHEL5
CouchDB API + PHP 程式設計參考
http://wiki.apache.org/couchdb/Getting_started_with_PHP
http://jan.prima.de/plok/index.php?url=archives/42-CouchDb-PHP-Hello-World-Tutorial.html&serendipity[cview]=threaded
安裝
#Enable the EPEL repository.
wget http://download.fedoraproject.org/pub/epel/6/x86_64/epel-release-6-8.noarch.rpm
rpm -ivh epel-release-6-8.noarch.rpm
#Install the couchdb package from EPEL:
yum -y install couchdb
#Edit config file to suit:
#vi /etc/couchdb/local.ini
#Start CouchDB:
service couchdb start
#Set it to start automatically on reboots:
chkconfig --level 345 couchdb on
(完)
[研究] Apache CouchDB 1.0.4 文件資料庫 安裝 (CentOS 6.5 x64)
http://shaurong.blogspot.com/2013/12/apache-couchdb-104-centos-65-x64.html
[研究] Apache CouchDB 文件資料庫 安裝 (CentOS 5.5 x86)
http://forum.icst.org.tw/phpbb/viewtopic.php?t=19393
[研究] Apache CouchDB 文件資料庫 安裝 (Fedora 14 x86)
http://forum.icst.org.tw/phpbb/viewtopic.php?t=19510
2013年12月30日 星期一
[研究] Angry IP Scanner 3.2.1 跨平台IP掃描工具
[研究] Angry IP Scanner 3.2.1 跨平台IP掃描工具
2013-120-30
Angry IP Scanner (or simply ipscan) is an open-source and cross-platform network scanner designed to be fast and simple to use. It scans IP addresses and ports as well as has many other features.
It is widely used by network administrators and just curious users around the world, including large and small enterprises, banks, and government agencies.
It runs on Linux, Windows, and Mac OS X, possibly supporting other platforms as well.
官方網站
http://www.angryip.org/w/Home
下載
http://www.angryip.org/w/Download
測試環境:Windows 7 x64
(下圖) 安裝 ipscan-3.2.1-setup.exe


(下圖) 安裝過程說執行 Angry IP Scanner 需要 JRE (Java Runtime Enviroment 1.6 版),但目前已經是 Java 1.7 的時代,先安裝 jre-7u45-windows-x64.exe 測試看看

(下圖) 執行 Angry IP Scanner 出現錯誤

(下圖) 改安裝 jre-7u45-windows-i586.exe 這個 32 位元的 JRE 版本

(下圖) 執行 Angry IP Scanner 成功


(完)
2013-120-30
Angry IP Scanner (or simply ipscan) is an open-source and cross-platform network scanner designed to be fast and simple to use. It scans IP addresses and ports as well as has many other features.
It is widely used by network administrators and just curious users around the world, including large and small enterprises, banks, and government agencies.
It runs on Linux, Windows, and Mac OS X, possibly supporting other platforms as well.
官方網站
http://www.angryip.org/w/Home
下載
http://www.angryip.org/w/Download
測試環境:Windows 7 x64
(下圖) 安裝 ipscan-3.2.1-setup.exe
(下圖) 安裝過程說執行 Angry IP Scanner 需要 JRE (Java Runtime Enviroment 1.6 版),但目前已經是 Java 1.7 的時代,先安裝 jre-7u45-windows-x64.exe 測試看看
(下圖) 執行 Angry IP Scanner 出現錯誤
(下圖) 改安裝 jre-7u45-windows-i586.exe 這個 32 位元的 JRE 版本
(下圖) 執行 Angry IP Scanner 成功
(完)
[研究] AllegroGrph Free 4.12.2 圖形資料庫 安裝(CentOS 6.5 x64)
[研究] AllegroGrph Free 4.12.2 圖形資料庫 安裝(CentOS 6.5 x64)
2013-12-30
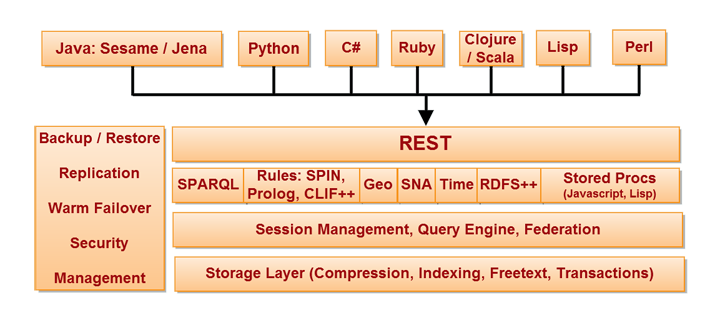
AllegroGrph 官方網站
http://www.franz.com/agraph/allegrograph/
架構
http://www.franz.com/agraph/allegrograph/ag_client-server_arch_4.2.2-small.png

下載
http://www.franz.com/downloads/clp/ag_validate_survey
Server下載 (只支援 64 bits OS)
http://www.franz.com/agraph/support/download/
http://www.franz.com/ftp/pri/acl/ag/ag4.12.2/linuxamd64.64/SE/agraph-4.12.2-1.x86_64.rpm
Client下載 (支援 32 bits 和 64 bits OS)
http://www.franz.com/agraph/allegrograph/clients.lhtml
...
安裝說明
http://www.franz.com/agraph/support/documentation/current/agraph-introduction.html
http://www.franz.com/agraph/support/documentation/v4/server-installation.html#header3-10
http://www.franz.com/agraph/support/documentation/v4/performance-tuning.html
安裝(在 x64底下安裝)
wget http://www.franz.com/ftp/pri/acl/ag/ag4.12.2/linuxamd64.64/SE/agraph-4.12.2-1.x86_64.rpm
rpm -ivh agraph-4.12.2-1.x86_64.rpm
設定
[root@localhost ~]# /usr/bin/configure-agraph
Welcome to the AllegroGraph configuration program. This script will
help you establish a baseline AllegroGraph configuration.
You will be prompted for a few settings. In most cases, you can hit return
to accept the default value.
Location of configuration file to create:
[/etc/agraph/agraph.cfg]:
/etc/agraph does not exist.
Would you like me to create it?:
[y]:
Directory to store data and settings:
[/var/lib/agraph]:
Directory to store log files:
[/var/log/agraph]:
Location of file to write server process id:
[/var/run/agraph/agraph.pid]:
User to run as:
[agraph]:
User 'agraph' doesn't exist on this system.
Create agraph user:
[y]:
Now you must set up an initial user account for AllegroGraph. This
account will have "super user" privileges in AllegroGraph.
SuperUser account name:
[super]:
SuperUser account password:
This question requires a non-blank answer.
SuperUser account password:(輸入密碼)
SuperUser account password (again):(再次輸入密碼)
Instance timeout seconds:
[604800]:
/etc/agraph/agraph.cfg has been created.
If desired, you may modify the configuration. When you are satisfied,
you may start the agraph service.
You can start AllegroGraph by running:
/sbin/service agraph start
You can stop AllegroGraph by running:
/sbin/service agraph stop
[root@localhost ~]#
啟動
[root@localhost ~]# /sbin/service agraph start
AllegroGraph Server Edition 4.12.2, built on November 21, 2013 14:02:30 GMT-0800
Copyright (c) 2005-2013 Franz Inc. All Rights Reserved.
AllegroGraph contains patented technology.
No patches loaded.
current-time: Thursday, December 26, 2013 09:42:34 PM
default-external-format: #<external-format :utf8 [(crlf-base-ef :utf8)]>
Daemonizing...
Server started normally: Running with free license of 5,000,000 triples; no-expiration.
Starting AllegroGraph: [ OK ]
[root@localhost ~]#
啟動瀏覽器,連上 firefox http://localhost:10035
-2013-12-30-20-03-29.png)
-2013-12-30-20-03-38.png)
-2013-12-30-20-04-03.png)
-2013-12-30-20-04-18.png)
-2013-12-30-20-04-19.png)
停止
[root@localhost ~]# /sbin/service agraph stop
Stopping agraph (24463): ..... Stopped
Stopping AllegroGraph: [ OK ]
[root@localhost ~]#
(完)
[研究] AllegroGrph Free 4.12.2 圖形資料庫 安裝(CentOS 6.5 x64)
http://shaurong.blogspot.tw/2013/12/allegrogrph-free-4122-centos-65-x64.html
[研究] AllegroGrph 4.2 圖形資料庫 安裝(CentOS 5.5 x64)
http://forum.icst.org.tw/phpbb/viewtopic.php?t=19429
2013-12-30
AllegroGrph 官方網站
http://www.franz.com/agraph/allegrograph/
架構
http://www.franz.com/agraph/allegrograph/ag_client-server_arch_4.2.2-small.png

下載
http://www.franz.com/downloads/clp/ag_validate_survey
Server下載 (只支援 64 bits OS)
http://www.franz.com/agraph/support/download/
http://www.franz.com/ftp/pri/acl/ag/ag4.12.2/linuxamd64.64/SE/agraph-4.12.2-1.x86_64.rpm
Client下載 (支援 32 bits 和 64 bits OS)
http://www.franz.com/agraph/allegrograph/clients.lhtml
...
安裝說明
http://www.franz.com/agraph/support/documentation/current/agraph-introduction.html
http://www.franz.com/agraph/support/documentation/v4/server-installation.html#header3-10
http://www.franz.com/agraph/support/documentation/v4/performance-tuning.html
安裝(在 x64底下安裝)
wget http://www.franz.com/ftp/pri/acl/ag/ag4.12.2/linuxamd64.64/SE/agraph-4.12.2-1.x86_64.rpm
rpm -ivh agraph-4.12.2-1.x86_64.rpm
設定
[root@localhost ~]# /usr/bin/configure-agraph
Welcome to the AllegroGraph configuration program. This script will
help you establish a baseline AllegroGraph configuration.
You will be prompted for a few settings. In most cases, you can hit return
to accept the default value.
Location of configuration file to create:
[/etc/agraph/agraph.cfg]:
/etc/agraph does not exist.
Would you like me to create it?:
[y]:
Directory to store data and settings:
[/var/lib/agraph]:
Directory to store log files:
[/var/log/agraph]:
Location of file to write server process id:
[/var/run/agraph/agraph.pid]:
User to run as:
[agraph]:
User 'agraph' doesn't exist on this system.
Create agraph user:
[y]:
Now you must set up an initial user account for AllegroGraph. This
account will have "super user" privileges in AllegroGraph.
SuperUser account name:
[super]:
SuperUser account password:
This question requires a non-blank answer.
SuperUser account password:(輸入密碼)
SuperUser account password (again):(再次輸入密碼)
Instance timeout seconds:
[604800]:
/etc/agraph/agraph.cfg has been created.
If desired, you may modify the configuration. When you are satisfied,
you may start the agraph service.
You can start AllegroGraph by running:
/sbin/service agraph start
You can stop AllegroGraph by running:
/sbin/service agraph stop
[root@localhost ~]#
啟動
[root@localhost ~]# /sbin/service agraph start
AllegroGraph Server Edition 4.12.2, built on November 21, 2013 14:02:30 GMT-0800
Copyright (c) 2005-2013 Franz Inc. All Rights Reserved.
AllegroGraph contains patented technology.
No patches loaded.
current-time: Thursday, December 26, 2013 09:42:34 PM
default-external-format: #<external-format :utf8 [(crlf-base-ef :utf8)]>
Daemonizing...
Server started normally: Running with free license of 5,000,000 triples; no-expiration.
Starting AllegroGraph: [ OK ]
[root@localhost ~]#
啟動瀏覽器,連上 firefox http://localhost:10035
-2013-12-30-20-03-29.png)
-2013-12-30-20-03-38.png)
-2013-12-30-20-04-03.png)
-2013-12-30-20-04-18.png)
-2013-12-30-20-04-19.png)
停止
[root@localhost ~]# /sbin/service agraph stop
Stopping agraph (24463): ..... Stopped
Stopping AllegroGraph: [ OK ]
[root@localhost ~]#
(完)
[研究] AllegroGrph Free 4.12.2 圖形資料庫 安裝(CentOS 6.5 x64)
http://shaurong.blogspot.tw/2013/12/allegrogrph-free-4122-centos-65-x64.html
[研究] AllegroGrph 4.2 圖形資料庫 安裝(CentOS 5.5 x64)
http://forum.icst.org.tw/phpbb/viewtopic.php?t=19429
[研究] 4store 1.1.5 資料庫安裝 (CentOS 6.5 x64)
[研究] 4store 1.1.5 資料庫安裝 (CentOS 6.5 x64)
2013-12-30
4store, an efficient, scalable and stable RDF database
官方網站
http://4store.org/
下載
http://4store.org/download/
參考
https://groups.google.com/forum/#!topic/4store-support/FUuac0NmZyw
安裝
wget http://repo.sparql.pro/centos/sparql-pro-1.0.0-1.noarch.rpm
wget http://download.fedoraproject.org/pub/epel/6/x86_64/epel-release-6-8.noarch.rpm
rpm -ivh sparql-pro-1.0.0-1.noarch.rpm
rpm -ivh epel-release-6-8.noarch.rpm
yum -y install 4store
4s-backend-setup DefaultKB
service 4store start
chkconfig --level 345 4store on
firefox http://localhost:8181/status/ &
執行畫面
-2013-12-30-19-25-08.png)
-2013-12-30-19-25-19.png)
-2013-12-30-19-25-22.png)
[root@localhost ~]# 4s-backend-setup DefaultKB
4store[2468]: backend-setup.c:186 erased files for KB DefaultKB
4store[2468]: backend-setup.c:318 created RDF metadata for KB DefaultKB
[root@localhost ~]#
[root@localhost ~]# service 4store start
Starting 4s-boss: [ OK ]
Starting 4s-backend: [ OK ]
Starting 4s-httpd: [ OK ]
[root@localhost ~]#
(完)
相關文章
[研究] 4store 1.1.5 資料庫安裝 (CentOS 6.5 x64)
http://shaurong.blogspot.com/2013/12/4store-115-centos-65-x64.html
[研究][問題] 4store 資料庫安裝 (CentOS 5.5 x86)
http://forum.icst.org.tw/phpbb/viewtopic.php?t=19426
[研究] 4store 資料庫安裝 (Fedora 14 x86)(成功)
http://forum.icst.org.tw/phpbb/viewtopic.php?f=21&t=19425
[研究] 4images 1.7.11 圖片藝廊 安裝(CentOS 6.5 x64)
[研究] 4images 1.7.11 圖片藝廊 快速安裝程式(CentOS 6.5 x64)
2013-12-30
# 4images_install_CentOS6.5x64.sh
#
# 4images - Image Gallery Management System
# WebSite: http://www.4homepages.de/
# DEMO : http://demo.4homepages.de/?l=english
# Language Pack Forum: http://www.4homepages.de/forum/index.php?board=16.0
# Language Pack Chinese Forum : http://www.4homepages.de/forum/index.php?topic=1183.0
# Language Pack Chinese : http://www.tkjlamps.com/upload/taiwan.zip
# Install : http://www.4homepages.de/forum/index.php?topic=26862.0
if [ "`grep SELINUX=disabled /etc/selinux/config`" == "" ]; then
/usr/sbin/setenforce 0
#echo "/usr/sbin/setenforce 0" >> /etc/rc.local
sed -i -e "s@SELINUX=enforcing@#SELINUX=enforcing@" /etc/selinux/config
sed -i -e "s@SELINUX=permissive@#SELINUX=permissive@" /etc/selinux/config
sed -i -e "/SELINUX=/aSELINUX=disabled" /etc/selinux/config
fi
yum -y install mysql mysql-server httpd php php-mysql wget php-mbstring php-gd
sed -i -e "s@AddDefaultCharset UTF-8@#AddDefaultCharset UTF-8@" /etc/httpd/conf/httpd.conf
sed -i -e "/AddDefaultCharset UTF-8/aAddDefaultCharset Big5" /etc/httpd/conf/httpd.conf
grep AddDefaultCharset /etc/httpd/conf/httpd.conf
service iptables stop
chkconfig iptables off
chkconfig httpd on
service httpd restart
chkconfig mysqld on
service mysqld restart
wget http://www.4homepages.de/downloads/9f9f37589ae5/4images1.7.11.zip
wget http://www.tkjlamps.com/upload/taiwan.zip
unzip 4images1.7.11.zip -d /var/www/html
unzip taiwan.zip -d /var/www/html/4images/lang
#mysqladmin -u username -p create databasename
mysql -e "create database 4imagesdb"
mysql -e "show databases; "
#mysql -e "use 4imagesdb; show tables;"
mysql -e "grant all on 4imagesdb.* to 4imagesuser@localhost; "
#mysql -e "GRANT SELECT, INSERT, UPDATE, DELETE, CREATE, DROP, INDEX, ALTER, CREATE TEMPORARY TABLES, LOCK TABLES ON 4imagesdb.* TO '4imagesuser'@'localhost' IDENTIFIED BY '4imagespassword';"
mysql -e "set password for 4imagesuser@localhost=password('4imagespassword'); "
mysql -e "flush privileges; "
mysql -e "use mysql; select Host,User,Password from user; "
chmod a+w /var/www/html/4images
firefox http://localhost/4images &
(下圖) 這些值可以自己修改,但是上面快速安裝程式設定值要跟著變更
主機名稱:localhost
資料庫名稱:4imagesdb
資料庫使用者名稱:4imagesuser
資料庫密碼:4imagespassword
時區:UTC+8
管理員名稱:自己輸入喜歡的
管理員密碼:自己輸入喜歡的
管理員密碼(確認):自己輸入喜歡的


成功後修改寫入權限
chmod a-w /var/www/html/4images
chmod -R a+w /var/www/html/4images/data
chmod -R a+w /var/www/html/4images/templates
(完)
[研究] 4images 1.7.9 圖片藝廊 快速安裝程式(CentOS 5.5 x86)
[研究] AWStats 7.2 安裝 (tgz)(CentOS 6.5 x86_64)
[研究] AWStats 7.2 安裝 (tgz)(CentOS 6.5 x86_64)
2013-12-30
參考
http://awstats.sourceforge.net/docs/awstats_setup.html
假設網站名稱為 www.shaurong.idv.tw,先在 /etc/hosts 增加 IP 和主機名稱對應
網址請依據自己情況修改相對應設定,以及輸入的命令
[root@localhost ~]# vi /etc/hosts
127.0.0.1 localhost localhost.localdomain localhost4 localhost4.localdomain4
::1 localhost localhost.localdomain localhost6 localhost6.localdomain6
192.168.128.104 www.shaurong.idv.tw
# 關閉防火牆
service iptables stop
chkconfig iptables off
# 關閉 SELinux,立刻生效 (但不保證 reboot 後)
/usr/sbin/setenforce 0
# 永久關閉 SELinux:把 /etc/selinux/config 中 SELINUX=enforcing 或 ELINUX=permissive 改為 SELINUX=disabled ( 要 reboot 後才生效)
sed -i -e "s@SELINUX=enforcing@#SELINUX=enforcing@" /etc/selinux/config
sed -i -e "s@SELINUX=permissive@#SELINUX=permissive@" /etc/selinux/config
sed -i -e "/SELINUX=/aSELINUX=disabled" /etc/selinux/config
# 安裝和啟動 httpd web server
yum -y install httpd
service httpd restart
# 下載安裝 awstats
wget http://sourceforge.net/projects/awstats/files/AWStats/7.2/awstats-7.2.tar.gz/download
tar zxvf awstats-7.2.tar.gz -C /usr/local
ln -s /usr/local/awstats-7.2 /usr/local/awstats
# 執行設定
[root@localhost tools]# cd /usr/local/awstats/tools
[root@localhost tools]# perl awstats_configure.pl
----- AWStats awstats_configure 1.0 (build 1.9) (c) Laurent Destailleur -----
This tool will help you to configure AWStats to analyze statistics for
one web server. You can try to use it to let it do all that is possible
in AWStats setup, however following the step by step manual setup
documentation (docs/index.html) is often a better idea. Above all if:
- You are not an administrator user,
- You want to analyze downloaded log files without web server,
- You want to analyze mail or ftp log files instead of web log files,
- You need to analyze load balanced servers log files,
- You want to 'understand' all possible ways to use AWStats...
Read the AWStats documentation (docs/index.html).
-----> Running OS detected: Linux, BSD or Unix
Warning: AWStats standard directory on Linux OS is '/usr/local/awstats'.
If you want to use standard directory, you should first move all content
of AWStats distribution from current directory:
/usr/local/awstats-7.2
to standard directory:
/usr/local/awstats
And then, run configure.pl from this location.
Do you want to continue setup from this NON standard directory [yN] ? Y
-----> Check for web server install
Enter full config file path of your Web server.
Example: /etc/httpd/httpd.conf
Example: /usr/local/apache2/conf/httpd.conf
Example: c:\Program files\apache group\apache\conf\httpd.conf
Config file path ('none' to skip web server setup):
> /etc/httpd/conf/httpd.conf
-----> Check and complete web server config file '/etc/httpd/conf/httpd.conf'
Add 'Alias /awstatsclasses "/usr/local/awstats-7.2/wwwroot/classes/"'
Add 'Alias /awstatscss "/usr/local/awstats-7.2/wwwroot/css/"'
Add 'Alias /awstatsicons "/usr/local/awstats-7.2/wwwroot/icon/"'
Add 'ScriptAlias /awstats/ "/usr/local/awstats-7.2/wwwroot/cgi-bin/"'
Add '<Directory>' directive
AWStats directives added to Apache config file.
-----> Update model config file '/usr/local/awstats-7.2/wwwroot/cgi-bin/awstats. model.conf'
File awstats.model.conf updated.
-----> Need to create a new config file ?
Do you want me to build a new AWStats config/profile
file (required if first install) [y/N] ? Y
-----> Define config file name to create
What is the name of your web site or profile analysis ?
Example: www.mysite.com
Example: demo
Your web site, virtual server or profile name:
> www.shaurong.idv.tw
-----> Define config file path
In which directory do you plan to store your config file(s) ?
Default: /etc/awstats
Directory path to store config file(s) (Enter for default):
>
-----> Create config file '/etc/awstats/awstats.www.shaurong.idv.tw.conf'
Config file /etc/awstats/awstats.www.shaurong.idv.tw.conf created.
-----> Restart Web server with '/sbin/service httpd restart'
httpd: Could not reliably determine the server's fully qualified domain name, using localhost.localdomain for ServerName
Stopping httpd: [ OK ]
Starting httpd: [ OK ]
-----> Add update process inside a scheduler
Sorry, configure.pl does not support automatic add to cron yet.
You can do it manually by adding the following command to your cron:
/usr/local/awstats-7.2/wwwroot/cgi-bin/awstats.pl -update -config=www.shaurong.idv.tw
Or if you have several config files and prefer having only one command:
/usr/local/awstats-7.2/tools/awstats_updateall.pl now
Press ENTER to continue...
A SIMPLE config file has been created: /etc/awstats/awstats.www.shaurong.idv.tw.conf
You should have a look inside to check and change manually main parameters.
You can then manually update your statistics for 'www.shaurong.idv.tw' with comm and:
> perl awstats.pl -update -config=www.shaurong.idv.tw
You can also read your statistics for 'www.shaurong.idv.tw' with URL:
> http://localhost/awstats/awstats.pl?config=www.shaurong.idv.tw
Press ENTER to finish...
[root@localhost tools]#
它會產生 /etc/awstats/awstats.www.shaurong.idv.tw.conf 檔案
( /etc/awstats/awstats.(網站名稱).conf )
# 設定 AWStats 抓的 log 是 access_log ( Apache Web Server log 預設的名稱)
cp /etc/awstats/awstats.www.shaurong.idv.tw.conf /etc/awstats/awstats.www.shaurong.idv.tw.conf.bak
sed -i -e "s@mylog.log@access_log@" /etc/awstats/awstats.www.shaurong.idv.tw.conf
sed -i -e "s@DNSLookup=2@DNSLookup=1@" /etc/awstats/awstats.www.shaurong.idv.tw.conf
# 讓 Apache Web Server 有權限存取 AWStats 目錄
chown -R apache:apache /usr/local/awstats/
# 建立 AWStats 預設需要的目錄
mkdir /var/lib/awstats
# 重新啟動 Apache Web Server,讓剛剛修改的 /etc/httpd/conf/httpd.conf 生效
service httpd restart
# 執行一次,產生畫面
/usr/local/awstats//wwwroot/cgi-bin/awstats.pl -update -config=www.shaurong.idv.tw
# 設定排程
echo '*/5 * * * * root /usr/local/awstats/wwwroot/cgi-bin/awstats.pl -update -config=www.shaurong.idv.tw' >> /etc/crontab
# 啟動瀏覽器,瀏覽 AWStats 畫面
firefox http://localhost/awstats/awstats.pl?config=www.shaurong.idv.tw &
PS: perl awstats_configure.pl 執行時候會替 httpd.conf 增加下面內容
#
# Directives to allow use of AWStats as a CGI
#
Alias /awstatsclasses "/usr/local/awstats-7.2/wwwroot/classes/"
Alias /awstatscss "/usr/local/awstats-7.2/wwwroot/css/"
Alias /awstatsicons "/usr/local/awstats-7.2/wwwroot/icon/"
ScriptAlias /awstats/ "/usr/local/awstats-7.2/wwwroot/cgi-bin/"
#
# This is to permit URL access to scripts/files in AWStats directory.
#
<Directory "/usr/local/awstats-7.2/wwwroot">
Options None
AllowOverride None
Order allow,deny
Allow from all
</Directory>
(完)
參考
[研究] AWStats 7.2 安裝 (tgz)(CentOS 6.5 x86_64)
http://shaurong.blogspot.tw/2013/12/awstats-72-tgzcentos-65-x8664.html
[研究] AWStats 7.2快速安裝程式精簡版(tgz)(CentOS 6.5 x86_64)
http://shaurong.blogspot.tw/2013/12/awstats-72tgzcentos-65-x8664.html
[研究] AWStats 7.2快速安裝程式精簡版(tgz)(CentOS 5.5 x86)
http://forum.icst.org.tw/phpbb/viewtopic.php?t=19200
[研究] AWStats記錄檔分析 安裝法(Fedora 7)
http://forum.icst.org.tw/phpbb/viewtopic.php?t=14960
[研究] AWStats 快速安裝程式精簡版(tgz)(CentOS 4.4, 5.1)
http://forum.icst.org.tw/phpbb/viewtopic.php?f=16&t=15013
[教學][研究] AWStats 快速安裝程式精簡版(Fedora 7,8,9)
http://forum.icst.org.tw/phpbb/viewtopic.php?f=16&t=15015
[研究] AWStats 7.2快速安裝程式精簡版(tgz)(CentOS 6.5 x86_64)
[研究] AWStats 7.2快速安裝程式精簡版(tgz)(CentOS 6.5 x86_64)
2013-12-30
參考
http://awstats.sourceforge.net/docs/awstats_setup.html
awstats_7.2_centos6.5x64.sh 內容如下:
(下面假設網站名稱為 www,請根據自己情況修改)
echo -e "\033[31m"
echo -e "Program : awstats_7.2_centos6.5x64.sh "
echo -e "AWStats Install Shell Script (CentOS 6.5, x86_64) "
echo -e "by Shau-Rong Lu 2013/12/30 "
echo -e "\033[0m"
# Ref : http://awstats.sourceforge.net/
# http://awstats.sourceforge.net/docs/index.html
# 關閉防火牆
service iptables stop
chkconfig iptables off
# 關閉 SELinux,立刻生效 (但不保證 reboot 後)
/usr/sbin/setenforce 0
# 永久關閉 SELinux:把 /etc/selinux/config 中 SELINUX=enforcing 或 ELINUX=permissive 改為 SELINUX=disabled ( 要 reboot 後才生效)
sed -i -e "s@SELINUX=enforcing@#SELINUX=enforcing@" /etc/selinux/config
sed -i -e "s@SELINUX=permissive@#SELINUX=permissive@" /etc/selinux/config
sed -i -e "/SELINUX=/aSELINUX=disabled" /etc/selinux/config
rpm -q httpd
if [ $? != "0" ]; then
yum -y install httpd
service httpd restart
fi
if [ ! -s awstats-7.2.tar.gz ]; then
wget http://sourceforge.net/projects/awstats/files/AWStats/7.2/awstats-7.2.tar.gz/download
fi
tar zxvf awstats-7.2.tar.gz -C /usr/local
ln -s /usr/local/awstats-7.2 /usr/local/awstats
cd /usr/local/awstats/tools
perl awstats_configure.pl
#會產生 /etc/awstats/awstats.(網站名稱).conf 這個檔案
cp /etc/awstats/awstats.www.conf /etc/awstats/awstats.www.conf.bak
sed -i -e "s@mylog.log@access_log@" /etc/awstats/awstats.www.conf
sed -i -e "s@DNSLookup=2@DNSLookup=1@" /etc/awstats/awstats.www.conf
chown -R apache:apache /usr/local/awstats/
#mv /etc/cron.hourly/awstats /etc/cron.daily/
service httpd restart
mkdir /var/lib/awstats
/usr/local/awstats//wwwroot/cgi-bin/awstats.pl -update -config=www
echo '*/5 * * * * root /usr/local/awstats/wwwroot/cgi-bin/awstats.pl -update -config=www' >> /etc/crontab
service httpd restart
firefox http://localhost/awstats/awstats.pl?config=www &
其中 perl awstats_configure.pl 執行時候輸入參數請參考下面
****************************************************
引言回覆:
[root@localhost tools]# perl awstats_configure.pl
----- AWStats awstats_configure 1.0 (build 1.9) (c) Laurent Destailleur -----
This tool will help you to configure AWStats to analyze statistics for
one web server. You can try to use it to let it do all that is possible
in AWStats setup, however following the step by step manual setup
documentation (docs/index.html) is often a better idea. Above all if:
- You are not an administrator user,
- You want to analyze downloaded log files without web server,
- You want to analyze mail or ftp log files instead of web log files,
- You need to analyze load balanced servers log files,
- You want to 'understand' all possible ways to use AWStats...
Read the AWStats documentation (docs/index.html).
-----> Running OS detected: Linux, BSD or Unix
Warning: AWStats standard directory on Linux OS is '/usr/local/awstats'.
If you want to use standard directory, you should first move all content
of AWStats distribution from current directory:
/usr/local/awstats-7.2
to standard directory:
/usr/local/awstats
And then, run configure.pl from this location.
Do you want to continue setup from this NON standard directory [yN] ? y
-----> Check for web server install
Enter full config file path of your Web server.
Example: /etc/httpd/httpd.conf
Example: /usr/local/apache2/conf/httpd.conf
Example: c:\Program files\apache group\apache\conf\httpd.conf
Config file path ('none' to skip web server setup):
> /etc/httpd/conf/httpd.conf
-----> Check and complete web server config file '/etc/httpd/conf/httpd.conf'
Add 'Alias /awstatsclasses "/usr/local/awstats-7.2/wwwroot/classes/"'
Add 'Alias /awstatscss "/usr/local/awstats-7.2/wwwroot/css/"'
Add 'Alias /awstatsicons "/usr/local/awstats-7.2/wwwroot/icon/"'
Add 'ScriptAlias /awstats/ "/usr/local/awstats-7.2/wwwroot/cgi-bin/"'
Add '<Directory>' directive
AWStats directives added to Apache config file.
-----> Update model config file '/usr/local/awstats-7.2/wwwroot/cgi-bin/awstats. model.conf'
File awstats.model.conf updated.
-----> Need to create a new config file ?
Do you want me to build a new AWStats config/profile
file (required if first install) [y/N] ? y
-----> Define config file name to create
What is the name of your web site or profile analysis ?
Example: www.mysite.com
Example: demo
Your web site, virtual server or profile name:
> www (請輸入網站名稱)
-----> Define config file path
In which directory do you plan to store your config file(s) ?
Default: /etc/awstats
Directory path to store config file(s) (Enter for default):
>
-----> Create config file '/etc/awstats/awstats.www.conf'
Config file /etc/awstats/awstats.www.conf created.
-----> Restart Web server with '/sbin/service httpd restart'
httpd: Could not reliably determine the server's fully qualified domain name, using localhost.localdomain for ServerName
Stopping httpd: [ OK ]
Starting httpd: [ OK ]
-----> Add update process inside a scheduler
Sorry, configure.pl does not support automatic add to cron yet.
You can do it manually by adding the following command to your cron:
/usr/local/awstats-7.2/wwwroot/cgi-bin/awstats.pl -update -config=www
Or if you have several config files and prefer having only one command:
/usr/local/awstats-7.2/tools/awstats_updateall.pl now
Press ENTER to continue...
A SIMPLE config file has been created: /etc/awstats/awstats.www.conf
You should have a look inside to check and change manually main parameters.
You can then manually update your statistics for 'www' with command:
> perl awstats.pl -update -config=www
You can also read your statistics for 'www' with URL:
> http://localhost/awstats/awstats.pl?config=www
Press ENTER to finish...
Stopping httpd: [ OK ]
Starting httpd: [Thu Dec 26 22:58:46 2013] [warn] The Alias directive in /etc/httpd/conf/httpd.conf at line 1014 will probably never match because it overlaps an earlier Alias.
[Thu Dec 26 22:58:46 2013] [warn] The Alias directive in /etc/httpd/conf/httpd.conf at line 1015 will probably never match because it overlaps an earlier Alias.
[Thu Dec 26 22:58:46 2013] [warn] The Alias directive in /etc/httpd/conf/httpd.conf at line 1016 will probably never match because it overlaps an earlier Alias.
[Thu Dec 26 22:58:46 2013] [warn] The ScriptAlias directive in /etc/httpd/conf/httpd.conf at line 1017 will probably never match because it overlaps an earlier ScriptAlias.
httpd: Could not reliably determine the server's fully qualified domain name, using localhost.localdomain for ServerName
[ OK ]
Create/Update database for config "/etc/awstats/awstats.www.conf" by AWStats version 7.2 (build 1.992)
From data in log file "/var/log/httpd/access_log"...
Phase 1 : First bypass old records, searching new record...
Searching new records from beginning of log file...
Jumped lines in file: 0
Parsed lines in file: 0
Found 0 dropped records,
Found 0 comments,
Found 0 blank records,
Found 0 corrupted records,
Found 0 old records,
Found 0 new qualified records.
[root@localhost ~]#
****************************************************
其中 perl awstats_configure.pl 執行時候會替 httpd.conf 增加下面內容
#
# Directives to allow use of AWStats as a CGI
#
Alias /awstatsclasses "/usr/local/awstats-7.2/wwwroot/classes/"
Alias /awstatscss "/usr/local/awstats-7.2/wwwroot/css/"
Alias /awstatsicons "/usr/local/awstats-7.2/wwwroot/icon/"
ScriptAlias /awstats/ "/usr/local/awstats-7.2/wwwroot/cgi-bin/"
#
# This is to permit URL access to scripts/files in AWStats directory.
#
<Directory "/usr/local/awstats-7.2/wwwroot">
Options None
AllowOverride None
Order allow,deny
Allow from all
</Directory>
****************************************************
-2013-12-30-14-05-01.png)
(完)
參考
[研究] AWStats 7.2 安裝 (tgz)(CentOS 6.5 x86_64)
http://shaurong.blogspot.tw/2013/12/awstats-72-tgzcentos-65-x8664.html
[研究] AWStats 7.2快速安裝程式精簡版(tgz)(CentOS 6.5 x86_64)
http://shaurong.blogspot.tw/2013/12/awstats-72tgzcentos-65-x8664.html
[研究] AWStats 7.2快速安裝程式精簡版(tgz)(CentOS 5.5 x86)
http://forum.icst.org.tw/phpbb/viewtopic.php?t=19200
[研究] AWStats記錄檔分析 安裝法(Fedora 7)
http://forum.icst.org.tw/phpbb/viewtopic.php?t=14960
[研究] AWStats 快速安裝程式精簡版(tgz)(CentOS 4.4, 5.1)
http://forum.icst.org.tw/phpbb/viewtopic.php?f=16&t=15013
[教學][研究] AWStats 快速安裝程式精簡版(Fedora 7,8,9)
http://forum.icst.org.tw/phpbb/viewtopic.php?f=16&t=15015
2013年12月29日 星期日
[研究] Hadoop 1.2.1 Cluster 安裝 (CentOS 6.5 x64)
[研究] Hadoop 1.2.1 Cluster 安裝 (CentOS 6.5 x64)
2013-12-29
小弟是新手,如有錯漏歡迎指教
參考資料
http://hadoop.apache.org/docs/r1.2.1/single_node_setup.html
http://hadoop.apache.org/docs/r1.2.1/cluster_setup.html
●環境
三台 CentOS 6.5 x86_64 64 bits 電腦
192.168.128.101 master01
192.168.128.102 slave01
192.168.128.103 slave02
●設定固定靜態 IP 和主機名稱 (三台都要做,注意 IP 和主機名稱是不同的)
設定固定 IP
[root@localhost ~]# vi /etc/sysconfig/network-scripts/ifcfg-eth0
DEVICE=eth0
HWADDR=00:0c:29:cd:49:e9
TYPE=Ethernet
UUID=778b0414-2c4b-4c39-877c-5902f145ec18
ONBOOT=yes
NM_CONTROLLED=yes
BOOTPROTO=none
IPADDR=192.168.128.101
NETMASK=255.255.255.0
GATEWAY=192.168.128.2
DNS1=192.168.128.2
IPV6INIT=no
USERCTL=no
設定主機與 IP 對應
echo "192.168.128.101 master01" >> /etc/hosts
echo "192.168.128.102 slave01" >> /etc/hosts
echo "192.168.128.103 slave02" >> /etc/hosts
cat /etc/hosts
或
[root@localhost ~]# vi /etc/hosts
127.0.0.1 localhost localhost.localdomain localhost4 localhost4.localdomain4
::1 localhost localhost.localdomain localhost6 localhost6.localdomain6
192.168.128.101 master01
192.168.128.102 slave01
192.168.128.103 slave02
設定 DNS Server
[root@localhost ~]# vi /etc/resolv.conf
# Generated by NetworkManager
nameserver 192.168.128.2
設定主機名稱 (會立刻生效,但 reboot 後失效)
[root@localhost ~]# hostname master01
測試
[root@localhost ~]# hostname
master01
設定主機名稱 (不會立刻生效,要 reboot 後生效)
[root@localhost local]# vi /etc/sysconfig/network
NETWORKING=yes
#HOSTNAME=localhost.localdomain
HOSTNAME=master01
重新啟動網路
[root@localhost local]# service network restart
Shutting down interface eth0: Device state: 3 (disconnected)
[ OK ]
Shutting down loopback interface: [ OK ]
Bringing up loopback interface: [ OK ]
Bringing up interface eth0: Active connection state: activated
Active connection path: /org/freedesktop/NetworkManager/ActiveConnection/1
[ OK ]
[root@localhost local]#
●安裝Oracle Java (三台都要做)
[研究] Oracle Java 手動安裝與快速安裝程式 (CentOS 6.5 x64)
http://shaurong.blogspot.tw/2013/12/oracle-java-centos-65-x64.html
[root@localhost ~]# ./JDK7U45x64_Install.sh
●安裝 Hadoop (三台都要做)
[root@master01 ~]# wget http://apache.cdpa.nsysu.edu.tw/hadoop/common/hadoop-1.2.1/hadoop-1.2.1-1.x86_64.rpm
[root@master01 ~]# rpm -ivh hadoop-1.2.1-1.x86_64.rpm
檢視現況
[root@master01 ~]# hadoop version
Hadoop 1.2.1
Subversion https://svn.apache.org/repos/asf/hadoop/common/branches/branch-1.2 -r 1503152
Compiled by mattf on Mon Jul 22 15:27:42 PDT 2013
From source with checksum 6923c86528809c4e7e6f493b6b413a9a
This command was run using /usr/share/hadoop/hadoop-core-1.2.1.jar
[root@master01 ~]# cat /etc/passwd | grep Hadoop
mapred:x:202:123:Hadoop MapReduce:/tmp:/bin/bash
hdfs:x:201:123:Hadoop HDFS:/tmp:/bin/bash
[root@master01 ~]# find / -name hadoop
/usr/bin/hadoop
/usr/etc/hadoop
/usr/share/hadoop
/usr/share/doc/hadoop
/usr/include/hadoop
/etc/hadoop
/var/log/hadoop
/var/run/hadoop
/var/lib/hadoop
[root@master01 ~]#
[root@master01 ~]# export | grep HADOOP
declare -x HADOOP_CLIENT_OPTS="-Xmx128m "
declare -x HADOOP_CONF_DIR="/etc/hadoop"
declare -x HADOOP_IDENT_STRING="root"
declare -x HADOOP_LOG_DIR="/var/log/hadoop/root"
declare -x HADOOP_NAMENODE_OPTS="-Dhadoop.security.logger=INFO,DRFAS -Dhdfs.audit.logger=INFO,DRFAAUDIT "
declare -x HADOOP_OPTS="-Djava.net.preferIPv4Stack=true "
declare -x HADOOP_PID_DIR="/var/run/hadoop"
declare -x HADOOP_SECONDARYNAMENODE_OPTS="-Dhadoop.security.logger=INFO,DRFAS -Dhdfs.audit.logger=INFO,DRFAAUDIT "
declare -x HADOOP_SECURE_DN_LOG_DIR="/var/log/hadoop/"
declare -x HADOOP_SECURE_DN_PID_DIR="/var/run/hadoop"
declare -x HADOOP_SECURE_DN_USER=""
[root@master01 ~]#
●新增map reduce使用者mr (三台都要做)
[root@master01 ~]# useradd mr
●執行Hadoop設定 (只要 master01 做,稍後會拷貝到另兩台)
其他可以用預設值,但注意最後 Proceed with generate configuration? (y/N) 要輸入 y
[root@master01 ~]# /usr/sbin/hadoop-setup-conf.sh
Setup Hadoop Configuration
Where would you like to put config directory? (/etc/hadoop)
Where would you like to put log directory? (/var/log/hadoop)
Where would you like to put pid directory? (/var/run/hadoop)
What is the host of the namenode? (master01)
Where would you like to put namenode data directory? (/var/lib/hadoop/hdfs/namenode)
Where would you like to put datanode data directory? (/var/lib/hadoop/hdfs/datanode)
What is the host of the jobtracker? (master01)
Where would you like to put jobtracker/tasktracker data directory? (/var/lib/hadoop/mapred)
Where is JAVA_HOME directory? (/usr/java/jdk1.7.0_45)
Would you like to create directories/copy conf files to localhost? (Y/n)
Review your choices:
Config directory : /etc/hadoop
Log directory : /var/log/hadoop
PID directory : /var/run/hadoop
Namenode host : master01
Namenode directory : /var/lib/hadoop/hdfs/namenode
Datanode directory : /var/lib/hadoop/hdfs/datanode
Jobtracker host : master01
Mapreduce directory : /var/lib/hadoop/mapred
Task scheduler : org.apache.hadoop.mapred.JobQueueTaskScheduler
JAVA_HOME directory : /usr/java/jdk1.7.0_45
Create dirs/copy conf files : y
Proceed with generate configuration? (y/N) y
chown: invalid user: `mr:hadoop'
chown: invalid user: `mr:hadoop'
chown: invalid user: `mr:hadoop'
Configuration setup is completed.
Proceed to run hadoop-setup-hdfs.sh on namenode.
[root@master01 ~]#
它幫忙修改下面設定檔案
[root@master01 ~]# ls -al /etc/hadoop/*.xml
-rw-r--r--. 1 root root 6930 Dec 29 12:08 /etc/hadoop/capacity-scheduler.xml
-rw-r--r--. 1 root root 2063 Dec 29 12:08 /etc/hadoop/core-site.xml
-rw-r--r--. 1 root root 327 Jul 23 06:29 /etc/hadoop/fair-scheduler.xml
-rw-r--r--. 1 root root 4653 Dec 29 12:08 /etc/hadoop/hadoop-policy.xml
-rw-r--r--. 1 root root 6589 Dec 29 12:08 /etc/hadoop/hdfs-site.xml
-rw-r--r--. 1 root root 298 Dec 29 12:08 /etc/hadoop/mapred-queue-acls.xml
-rw-r--r--. 1 root root 9589 Dec 29 12:08 /etc/hadoop/mapred-site.xml
[root@master01 ~]#
● 編輯Master和Slaves (只要 master01 做,稍後會拷貝到另兩台)
[root@ master01 ~]# vi /etc/hadoop/masters
master01
[root@ master01 ~]# vi /etc/hadoop/slaves
master01
slave01
slave02
●設定 ssh 連線免輸入密碼(三台都要做)
目的是讓master01能自動連進slave01 ,slave02啟動各台機器的相關服務,如Datanode和task服務
[root@ master01 ~]# yum -y install openssh rsync sshd
[root@ master01 ~]# service sshd restart
[root@ master01 ~]# ssh-keygen -t dsa -P '' -f ~/.ssh/id_dsa
Generating public/private dsa key pair.
Your identification has been saved in /root/.ssh/id_dsa.
Your public key has been saved in /root/.ssh/id_dsa.pub.
The key fingerprint is:
ca:04:30:8d:be:bd:91:a2:c3:c4:94:cf:18:c3:43:cb root@localhost.localdomain
The key's randomart image is:
+--[ DSA 1024]----+
| oo |
| ..o. |
|+.o . |
| E. . |
|o Bo .. S |
| +oo+o . |
|o. . oo |
|o. . |
| . |
+-----------------+
[hadoop@ master01 ~]# cat ~/.ssh/id_dsa.pub >> ~/.ssh/authorized_keys
[hadoop@ master01 ~]# chmod 600 ~/.ssh/authorized_keys
slave01 上也執行
yum -y install openssh rsync sshd
service sshd restart
ssh-keygen -t dsa -P '' -f ~/.ssh/id_dsa
cat ~/.ssh/id_dsa.pub >> ~/.ssh/authorized_keys
chmod 600 ~/.ssh/authorized_keys
slave02 上也執行
yum -y install openssh rsync sshd
service sshd restart
ssh-keygen -t dsa -P '' -f ~/.ssh/id_dsa
cat ~/.ssh/id_dsa.pub >> ~/.ssh/authorized_keys
chmod 600 ~/.ssh/authorized_keys
讓自己 ssh 自己免登入密碼 (三台要各自做,都是連 root@localhost)
第一次執行會問,回答 yes,執行 exit 離開
[root@master01 ~]# ssh root@localhost
The authenticity of host 'localhost (::1)' can't be established.
RSA key fingerprint is 6d:a4:8e:a6:b5:b0:e9:c4:e8:5b:55:be:e4:bd:04:60.
Are you sure you want to continue connecting (yes/no)? yes
Warning: Permanently added 'localhost' (RSA) to the list of known hosts.
Last login: Thu Dec 26 18:30:35 2013 from 192.168.128.1
[root@master01 ~]# exit
logout
Connection to localhost closed.
第二次應該不會問,執行 exit 離開
[root@master01 ~]# ssh root@localhost
Last login: Thu Dec 26 18:31:05 2013 from localhost
[root@master01 ~]# exit
logout
Connection to localhost closed.
[root@master01 ~]#
檢視一下
[root@master01 ~]# cat ~/.ssh/authorized_keys
ssh-dss AAAAB3NzaC1kc3MAAACBAJvVJ7rK7QX2JcAGAwk85l5B7Cm2QUIrQ6RjaSsMDQTZEV6LJ8lWAkdlXIOJhte0EzylPLzxUvckjpr9wEtoZjBjh6i8qklzheQMfLbZUQG3QAxWqeoZYbSdDnoIsHOBSQbckjYiUOvpQECIetiBDQQUdjWglB8jLKWGWa42hUXPAAAAFQDMVDU+CdpFDmp/6PhvBiREpIwHAwAAAIAzXR5aFwO0pUWPAltTwkoruJkiOzl+iC5mrXUJQaEwXXnWJLBYxwLVm/sbNFcMBRLN6+DDp0RoYKe+AIiK51TPVlKGXqfpdPNMkrYYuJronkLGfRg215ko5DCFs/Zz9xsEHfKo48dmn/jy0fySvABwb6LAy3TFYgJBOHpp+lwVtgAAAIBrV22S3BubY4WU2T/BDHY9lfcz4nlSfV5izfjpnAXQ+e5NxD5NlGXmANb6vUcS3z9/dYXpHgAb4ZlpWEYFCLbiALA11fdscHA/bxdYp0nyhHZsZOAZQMR8Hzb6c/xX+btC5+3vmoNsTjhAySmke7SKnQR6yUFvBtjs+D3xvUZc6g== root@master01
[root@master01 ~]# cat ~/.ssh/known_hosts
localhost ssh-rsa AAAAB3NzaC1yc2EAAAABIwAAAQEAnCCNfMSnYd+cqCXPG3d+Okhz7BRxNjPx5dvA5PdeWEHKFvGBgJPX3m8cKMbD5yH9OTUEO9+gaUwSPCzAXFrUIbgEVzHdhVlWHN3MC+qGxp5ZNYf4JbyJzVhH0P5lbOTn6VNfVRJoMf1Ff1+D6OLXJ6vx1ZVpiEBiWZc3szFXvd/BpEazFUaSLhAR3UopKJ2r6GVjnVTpEWHhIs4hkiEHkLPUQfdupRmjZ4QMfoT2PJ36Yc4Xk+z/ShPBQsnrhMJyMwwvkm0WTJKrAGHQxiIzxbE3oPUHc/4n41tD9n1uREsVzILm7mb6VpYAbLSPkeplIqt9DA9itNRwDUjta98Eaw==
(三台要各自做,都是連 root@localhost)
後面那一串亂碼,各台機器上可能不同,你我也可能不同
編輯
[root@master01 ~]# vi ~/.ssh/known_hosts
localhost ssh-rsa AAAAB3NzaC1yc2EAAAABIwAAAQEAnCCNfMSnYd+cqCXPG3d+Okhz7BRxNjPx5dvA5PdeWEHKFvGBgJPX3m8cKMbD5yH9OTUEO9+gaUwSPCzAXFrUIbgEVzHdhVlWHN3MC+qGxp5ZNYf4JbyJzVhH0P5lbOTn6VNfVRJoMf1Ff1+D6OLXJ6vx1ZVpiEBiWZc3szFXvd/BpEazFUaSLhAR3UopKJ2r6GVjnVTpEWHhIs4hkiEHkLPUQfdupRmjZ4QMfoT2PJ36Yc4Xk+z/ShPBQsnrhMJyMwwvkm0WTJKrAGHQxiIzxbE3oPUHc/4n41tD9n1uREsVzILm7mb6VpYAbLSPkeplIqt9DA9itNRwDUjta98Eaw==
內容改成下面 (增加一些主機)
localhost,127.0.0.1,master01,192.168.128.101 ssh-rsa AAAAB3NzaC1yc2EAAAABIwAAAQEAnCCNfMSnYd+cqCXPG3d+Okhz7BRxNjPx5dvA5PdeWEHKFvGBgJPX3m8cKMbD5yH9OTUEO9+gaUwSPCzAXFrUIbgEVzHdhVlWHN3MC+qGxp5ZNYf4JbyJzVhH0P5lbOTn6VNfVRJoMf1Ff1+D6OLXJ6vx1ZVpiEBiWZc3szFXvd/BpEazFUaSLhAR3UopKJ2r6GVjnVTpEWHhIs4hkiEHkLPUQfdupRmjZ4QMfoT2PJ36Yc4Xk+z/ShPBQsnrhMJyMwwvkm0WTJKrAGHQxiIzxbE3oPUHc/4n41tD9n1uREsVzILm7mb6VpYAbLSPkeplIqt9DA9itNRwDUjta98Eaw==
slave01 主機上的 ~/.ssh/known_hosts (注意 IP 和主機名稱不同)
localhost,127.0.0.1,slave01,192.168.128.102 ssh-rsa AAAAB3NzaC1yc2EAAAABIwAAAQEAnCCNfMSnYd+cqCXPG3d+Okhz7BRxNjPx5dvA5PdeWEHKFvGBgJPX3m8cKMbD5yH9OTUEO9+gaUwSPCzAXFrUIbgEVzHdhVlWHN3MC+qGxp5ZNYf4JbyJzVhH0P5lbOTn6VNfVRJoMf1Ff1+D6OLXJ6vx1ZVpiEBiWZc3szFXvd/BpEazFUaSLhAR3UopKJ2r6GVjnVTpEWHhIs4hkiEHkLPUQfdupRmjZ4QMfoT2PJ36Yc4Xk+z/ShPBQsnrhMJyMwwvkm0WTJKrAGHQxiIzxbE3oPUHc/4n41tD9n1uREsVzILm7mb6VpYAbLSPkeplIqt9DA9itNRwDUjta98Eaw==
slave02 主機上的 ~/.ssh/known_hosts (注意 IP 和主機名稱不同)
localhost,127.0.0.1,slave02,192.168.128.103 ssh-rsa AAAAB3NzaC1yc2EAAAABIwAAAQEAnCCNfMSnYd+cqCXPG3d+Okhz7BRxNjPx5dvA5PdeWEHKFvGBgJPX3m8cKMbD5yH9OTUEO9+gaUwSPCzAXFrUIbgEVzHdhVlWHN3MC+qGxp5ZNYf4JbyJzVhH0P5lbOTn6VNfVRJoMf1Ff1+D6OLXJ6vx1ZVpiEBiWZc3szFXvd/BpEazFUaSLhAR3UopKJ2r6GVjnVTpEWHhIs4hkiEHkLPUQfdupRmjZ4QMfoT2PJ36Yc4Xk+z/ShPBQsnrhMJyMwwvkm0WTJKrAGHQxiIzxbE3oPUHc/4n41tD9n1uREsVzILm7mb6VpYAbLSPkeplIqt9DA9itNRwDUjta98Eaw==
● 讓所有 master 用 ssh 連其他 slave 免密碼 (master01 和 slave01,slave02 作法不同)
master01 主機上,把 key 拷貝到 slave01
[root@master01 ~]# scp ~/.ssh/authorized_keys root@slave01:~/.ssh/authorized_keys_from_master01
The authenticity of host 'slave01 (192.168.128.102)' can't be established.
RSA key fingerprint is b5:78:67:c6:4b:29:82:9d:f7:49:e7:02:d9:ec:09:17.
Are you sure you want to continue connecting (yes/no)? yes
Warning: Permanently added 'slave01,192.168.128.102' (RSA) to the list of known hosts.
root@slave01's password:
authorized_keys 100% 611 0.6KB/s 00:00
master01 主機上,把 key 拷貝到 slave02
[root@master01 ~]# scp ~/.ssh/authorized_keys root@slave02:~/.ssh/authorized_keys_from_master01
The authenticity of host 'slave02 (192.168.128.103)' can't be established.
RSA key fingerprint is ac:e1:83:2b:ee:e2:e2:0b:1c:df:06:c7:84:1b:56:de.
Are you sure you want to continue connecting (yes/no)? yes
Warning: Permanently added 'slave02,192.168.128.103' (RSA) to the list of known hosts.
root@slave02's password:
authorized_keys 100% 611 0.6KB/s 00:00
slave01 主機上,把 master01 的 key 放入授權檔案
[root@slave01 ~]# cat ~/.ssh/authorized_keys_from_master01 >> ~/.ssh/authorized_keys
檢視
[root@slave01 ~]# cat ~/.ssh/authorized_keys
ssh-dss AAAAB3NzaC1kc3MAAACBAOYUc5Q7GXnQgHdL3durY297VrEBFrFbTiqNcQoxUjsO1H9exXxU2U06ahcxVGM1sMOqgbTy5aQrNk6P6Lv0f3Lxwks+C07BeY0SBdfmoRotN/8dPb/4Ykk9WSRBo0x7a8HMWqidoVwb73Etsyc10aa0ujP/iwKVhICKY6w3y+IpAAAAFQCT+NAUGf3DhKCUgNBpkVVvWUts7QAAAIBHT4CIqeo2TAKrpF9chXNdd3IklAeidfpwb/p8WGVB0qdrgf8g7OD1E5/ZbSM7aebmbAR9AMGjTi+tcCbmI53JhuHLnMzrmP1P6+BmZxfiq1//GNz2uOsrLZzV4+BLKA7DNYgdeCLV7/GsQX0kc7FZLwK1mtdZVDMI+rOsB/j6sAAAAIEAzBZ3cv9L4qmaY3FoAttr3wbt2c1JJIWFo0CUCc+icDYM8S7jGmVOScfFAg0M81VLJVEli1Tr7/MRFJxEftHRSxEdooUBltRXmx5XjXfEM9tXN/nT9RuSiQop5XCMMSNFVYF/G1XxywyAh7mRvreibG0fxcfyuC2meorqa31PlCU= root@slave01
ssh-dss AAAAB3NzaC1kc3MAAACBAJvVJ7rK7QX2JcAGAwk85l5B7Cm2QUIrQ6RjaSsMDQTZEV6LJ8lWAkdlXIOJhte0EzylPLzxUvckjpr9wEtoZjBjh6i8qklzheQMfLbZUQG3QAxWqeoZYbSdDnoIsHOBSQbckjYiUOvpQECIetiBDQQUdjWglB8jLKWGWa42hUXPAAAAFQDMVDU+CdpFDmp/6PhvBiREpIwHAwAAAIAzXR5aFwO0pUWPAltTwkoruJkiOzl+iC5mrXUJQaEwXXnWJLBYxwLVm/sbNFcMBRLN6+DDp0RoYKe+AIiK51TPVlKGXqfpdPNMkrYYuJronkLGfRg215ko5DCFs/Zz9xsEHfKo48dmn/jy0fySvABwb6LAy3TFYgJBOHpp+lwVtgAAAIBrV22S3BubY4WU2T/BDHY9lfcz4nlSfV5izfjpnAXQ+e5NxD5NlGXmANb6vUcS3z9/dYXpHgAb4ZlpWEYFCLbiALA11fdscHA/bxdYp0nyhHZsZOAZQMR8Hzb6c/xX+btC5+3vmoNsTjhAySmke7SKnQR6yUFvBtjs+D3xvUZc6g== root@master01
兩行的最後分別是 root@slave01 和 root@master01,表示這兩個帳號可以免密碼 ssh 登入
slave02 主機上,把 master01 的 key 放入授權檔案
[root@slave02 ~]# cat ~/.ssh/authorized_keys_from_master01 >> ~/.ssh/authorized_keys
●把 hadoop 設定檔案從 master01 複製拷貝到 slave01, slave02 (只要 master01 做)
[root@master01 ~]# scp /etc/hadoop/* root@192.168.128.102:/etc/hadoop/.
[root@master01 ~]# scp /etc/hadoop/* root@192.168.128.103:/etc/hadoop/.
●格式化分散式檔案系統
[root@master01 ~]# hadoop namenode -format
13/12/29 12:25:39 INFO namenode.NameNode: STARTUP_MSG:
/************************************************************
STARTUP_MSG: Starting NameNode
STARTUP_MSG: host = master01/192.168.128.101
STARTUP_MSG: args = [-format]
STARTUP_MSG: version = 1.2.1
STARTUP_MSG: build = https://svn.apache.org/repos/asf/hadoop/common/branches/branch-1.2 -r 1503152; compiled by 'mattf' on Mon Jul 22 15:27:42 PDT 2013
STARTUP_MSG: java = 1.7.0_45
************************************************************/
13/12/29 12:25:39 INFO util.GSet: Computing capacity for map BlocksMap
13/12/29 12:25:39 INFO util.GSet: VM type = 64-bit
13/12/29 12:25:39 INFO util.GSet: 2.0% max memory = 129761280
13/12/29 12:25:39 INFO util.GSet: capacity = 2^18 = 262144 entries
13/12/29 12:25:39 INFO util.GSet: recommended=262144, actual=262144
13/12/29 12:25:39 INFO namenode.FSNamesystem: fsOwner=root
13/12/29 12:25:39 INFO namenode.FSNamesystem: supergroup=supergroup
13/12/29 12:25:39 INFO namenode.FSNamesystem: isPermissionEnabled=true
13/12/29 12:25:39 INFO namenode.FSNamesystem: dfs.block.invalidate.limit=100
13/12/29 12:25:39 INFO namenode.FSNamesystem: isAccessTokenEnabled=false accessKeyUpdateInterval=0 min(s), accessTokenLifetime=0 min(s)
13/12/29 12:25:39 INFO namenode.FSEditLog: dfs.namenode.edits.toleration.length = 0
13/12/29 12:25:39 INFO namenode.NameNode: Caching file names occuring more than 10 times
13/12/29 12:25:40 INFO common.Storage: Image file /var/lib/hadoop/hdfs/namenode/current/fsimage of size 110 bytes saved in 0 seconds.
13/12/29 12:25:40 INFO namenode.FSEditLog: closing edit log: position=4, editlog=/var/lib/hadoop/hdfs/namenode/current/edits
13/12/29 12:25:40 INFO namenode.FSEditLog: close success: truncate to 4, editlog=/var/lib/hadoop/hdfs/namenode/current/edits
13/12/29 12:25:40 INFO common.Storage: Storage directory /var/lib/hadoop/hdfs/namenode has been successfully formatted.
13/12/29 12:25:40 INFO namenode.NameNode: SHUTDOWN_MSG:
/************************************************************
SHUTDOWN_MSG: Shutting down NameNode at master01/192.168.128.101
************************************************************/
[root@master01 ~]#
●測試啟動各項Hadoop服務(三台)
(偷懶一點就各項服務的測試跳過,等 start-all.sh 發現異常再測試)
測試啟動和停止 Namenode
小弟經驗,不管用 hadoop-daemon.sh 或 start-all.sh 或 stop-all.sh 去啟動或停止,
就算告訴你成功,都沒有 100% 可靠,最好用 ps 檢查
[root@master01 hadoop]# /usr/sbin/hadoop-daemon.sh start namenode
starting namenode, logging to /var/log/hadoop/root/hadoop-root-namenode-master01.out
[root@master01 sbin]# ps aux | grep hadoop | awk '{print $1 "\t" $2 "\t" $11 "\t" $12}'
root 34233 /usr/java/jdk1.7.0_45/bin/java -Dproc_namenode
root 34297 grep hadoop
為了避免麻煩,可以建立一個 hs.sh 專門執行這串複雜指令
[root@master01 hadoop]# vi /usr/bin/hs.sh
內容
ps aux | grep hadoop | awk '{print $1 "\t" $2 "\t" $11 "\t" $12}'
設定成可執行
[root@master01 hadoop]# chmod +x /usr/bin/hs.sh
或
[root@master01 ~]# jps
5267 JobTracker
29599 Jps
5394 TaskTracker
5047 DataNode
4927 NameNode
5174 SecondaryNameNode
[root@master01 ~]# find / -name jps
/usr/java/jdk1.7.0_45/bin/jps
[root@master01 hadoop]# /usr/sbin/hadoop-daemon.sh stop namenode
stopping namenode
測試啟動和停止 Datanode
[root@master01 hadoop]# /usr/sbin/hadoop-daemon.sh start datanode
starting datanode, logging to /var/log/hadoop/root/hadoop-root-datanode-master01.out
[root@master01 sbin]# ps aux | grep hadoop | awk '{print $1 "\t" $2 "\t" $11 "\t" $12}'
root 34327 /usr/java/jdk1.7.0_45/bin/java -Dproc_datanode
root 34392 grep hadoop
[root@master01 hadoop]# /usr/sbin/hadoop-daemon.sh stop datanode
stopping datanode
測試啟動和停止 jobtracker
[root@master01 hadoop]# /usr/sbin/hadoop-daemon.sh start jobtracker
starting jobtracker, logging to /var/log/hadoop/root/hadoop-root-jobtracker-master01.out
[root@master01 sbin]# ps aux | grep hadoop | awk '{print $1 "\t" $2 "\t" $11 "\t" $12}'
root 34424 /usr/java/jdk1.7.0_45/bin/java -Dproc_jobtracker
root 34497 grep hadoop
[root@master01 hadoop]# /usr/sbin/hadoop-daemon.sh stop jobtracker
stopping jobtracker
測試啟動和停止 tasktracker
[root@master01 hadoop]# /usr/sbin/hadoop-daemon.sh start tasktracker
starting tasktracker, logging to /var/log/hadoop/root/hadoop-root-tasktracker-master01.out
[root@master01 ~]# ps aux | grep hadoop | awk '{print $1 "\t" $2 "\t" $11 "\t" $12}'
root 34119 /usr/java/jdk1.7.0_45/bin/java -Dproc_tasktracker
root 34169 grep hadoop
[root@master01 hadoop]# /usr/sbin/hadoop-daemon.sh stop tasktracker
stopping tasktracker
全部測試成功之後測試啟動全部服務
避免防火牆問題,先停掉它
[root@master01 ~]# service iptables stop
[root@slave01 ~]# service iptables stop
[root@slave02 ~]# service iptables stop
[root@master01 ~]# chkconfig iptables off
[root@slave01 ~]# chkconfig iptables off
[root@slave02 ~]# chkconfig iptables off
[root@master01 ~]# chmod +x /usr/sbin/*.sh
[root@slave01 ~]# chmod +x /usr/sbin/*.sh
[root@slave02 ~]# chmod +x /usr/sbin/*.sh
●啟動 hadoop cluster (只要 master01 做,會自動啟動 slave01 和 slave02)
[root@master01 ~]# start-all.sh
starting namenode, logging to /var/log/hadoop/root/hadoop-root-namenode-master01.out
slave01: starting datanode, logging to /var/log/hadoop/root/hadoop-root-datanode-slave01.out
slave02: starting datanode, logging to /var/log/hadoop/root/hadoop-root-datanode-slave02.out
master01: starting datanode, logging to /var/log/hadoop/root/hadoop-root-datanode-master01.out
master01: starting secondarynamenode, logging to /var/log/hadoop/root/hadoop-root-secondarynamenode-master01.out
starting jobtracker, logging to /var/log/hadoop/root/hadoop-root-jobtracker-master01.out
slave01: starting tasktracker, logging to /var/log/hadoop/root/hadoop-root-tasktracker-slave01.out
slave02: starting tasktracker, logging to /var/log/hadoop/root/hadoop-root-tasktracker-slave02.out
master01: starting tasktracker, logging to /var/log/hadoop/root/hadoop-root-tasktracker-master01.out
master01 上檢查
[root@master01 ~]# hs.sh
root 3330 /usr/java/jdk1.7.0_45/bin/java -Dproc_namenode
root 3449 /usr/java/jdk1.7.0_45/bin/java -Dproc_datanode
root 3575 /usr/java/jdk1.7.0_45/bin/java -Dproc_secondarynamenode
root 3667 /usr/java/jdk1.7.0_45/bin/java -Dproc_jobtracker
root 3792 /usr/java/jdk1.7.0_45/bin/java -Dproc_tasktracker
root 3843 grep hadoop
[root@master01 ~]#
slave01 上檢查
[root@slave01 ~]# hs.sh
root 2456 /usr/java/jdk1.7.0_45/bin/java -Dproc_datanode
root 2551 /usr/java/jdk1.7.0_45/bin/java -Dproc_tasktracker
root 2623 grep hadoop
[root@slave01 ~]#
slave02 上檢查
[root@slave02 ~]# hs.sh
root 2456 /usr/java/jdk1.7.0_45/bin/java -Dproc_datanode
root 2551 /usr/java/jdk1.7.0_45/bin/java -Dproc_tasktracker
root 2623 grep hadoop
[root@slave02 ~]#
●測試Hadoop網頁管理功能
測試HSDF網頁管理介面
http://192.168.128.101:50070

(下圖) 按下上圖中 Browse the filesystem 超連結後 (疑似有問題,待查)

(下圖) 按下第一張圖中 Live Nodes 超連結後

(下圖) 按下第一張圖中 Dead Nodes 超連結後

(下圖) 按下第一張圖中 Decommissioning Nodes 超連結後

(下圖) 測試MapReduce網頁管理介面
http://192.168.128.101:50030


(下圖) 按下上圖中 default 超連結的畫面

停止
[root@master01 ~]# /usr/sbin/stop-all.sh
stopping jobtracker
slave01: stopping tasktracker
slave02: stopping tasktracker
master01: stopping tasktracker
stopping namenode
slave01: stopping datanode
master01: stopping datanode
slave02: stopping datanode
master01: stopping secondarynamenode
[root@master01 ~]#
(完)
相關
[研究] Hadoop 2.2.0 Cluster 安裝 (CentOS 6.5 x64)
http://shaurong.blogspot.tw/2013/12/hadoop-220-cluster-centos-65-x64.html
[研究] Hadoop 1.2.1 Cluster 安裝 (CentOS 6.5 x64)
http://shaurong.blogspot.tw/2013/12/hadoop-121-cluster-centos-65-x64_29.html
[研究] Hadoop 2.2.0 編譯 (CentOS 6.4 x64)
http://shaurong.blogspot.tw/2013/11/hadoop-220-centos-64-x64.html
[研究] Hadoop 2.2.0 Single Cluster 安裝 (二)(CentOS 6.4 x64)
http://shaurong.blogspot.tw/2013/11/hadoop-220-single-cluster-centos-64-x64_7.html
[研究] Hadoop 2.2.0 Single Cluster 安裝 (一)(CentOS 6.4 x64)
http://shaurong.blogspot.tw/2013/11/hadoop-220-single-cluster-centos-64-x64.html
[研究] Hadoop 1.2.1 (rpm)安裝 (CentOS 6.4 x64)
http://shaurong.blogspot.tw/2013/10/hadoop-121-rpm-centos-64-x64.html
[研究] Hadoop 1.2.1 (bin)安裝 (CentOS 6.4 x64)
http://shaurong.blogspot.tw/2013/07/hadoop-112-centos-64-x64.html
[研究] Hadoop 1.2.1 安裝 (CentOS 6.4 x64)
http://forum.icst.org.tw/phpbb/viewtopic.php?t=80035
[研究] 雲端軟體 Hadoop 1.0.0 安裝 (CentOS 6.2 x86)
http://forum.icst.org.tw/phpbb/viewtopic.php?t=21166
[研究] 雲端軟體 Hadoop 0.20.2 安裝 (CentOS 5.5 x86)
http://forum.icst.org.tw/phpbb/viewtopic.php?t=18513
[研究] 雲端軟體 Hadoop 0.20.2 安裝 (CentOS 5.4 x86)
http://forum.icst.org.tw/phpbb/viewtopic.php?t=17974
2013-12-29
小弟是新手,如有錯漏歡迎指教
參考資料
http://hadoop.apache.org/docs/r1.2.1/single_node_setup.html
http://hadoop.apache.org/docs/r1.2.1/cluster_setup.html
●環境
三台 CentOS 6.5 x86_64 64 bits 電腦
192.168.128.101 master01
192.168.128.102 slave01
192.168.128.103 slave02
●設定固定靜態 IP 和主機名稱 (三台都要做,注意 IP 和主機名稱是不同的)
設定固定 IP
[root@localhost ~]# vi /etc/sysconfig/network-scripts/ifcfg-eth0
DEVICE=eth0
HWADDR=00:0c:29:cd:49:e9
TYPE=Ethernet
UUID=778b0414-2c4b-4c39-877c-5902f145ec18
ONBOOT=yes
NM_CONTROLLED=yes
BOOTPROTO=none
IPADDR=192.168.128.101
NETMASK=255.255.255.0
GATEWAY=192.168.128.2
DNS1=192.168.128.2
IPV6INIT=no
USERCTL=no
設定主機與 IP 對應
echo "192.168.128.101 master01" >> /etc/hosts
echo "192.168.128.102 slave01" >> /etc/hosts
echo "192.168.128.103 slave02" >> /etc/hosts
cat /etc/hosts
或
[root@localhost ~]# vi /etc/hosts
127.0.0.1 localhost localhost.localdomain localhost4 localhost4.localdomain4
::1 localhost localhost.localdomain localhost6 localhost6.localdomain6
192.168.128.101 master01
192.168.128.102 slave01
192.168.128.103 slave02
設定 DNS Server
[root@localhost ~]# vi /etc/resolv.conf
# Generated by NetworkManager
nameserver 192.168.128.2
設定主機名稱 (會立刻生效,但 reboot 後失效)
[root@localhost ~]# hostname master01
測試
[root@localhost ~]# hostname
master01
設定主機名稱 (不會立刻生效,要 reboot 後生效)
[root@localhost local]# vi /etc/sysconfig/network
NETWORKING=yes
#HOSTNAME=localhost.localdomain
HOSTNAME=master01
重新啟動網路
[root@localhost local]# service network restart
Shutting down interface eth0: Device state: 3 (disconnected)
[ OK ]
Shutting down loopback interface: [ OK ]
Bringing up loopback interface: [ OK ]
Bringing up interface eth0: Active connection state: activated
Active connection path: /org/freedesktop/NetworkManager/ActiveConnection/1
[ OK ]
[root@localhost local]#
●安裝Oracle Java (三台都要做)
[研究] Oracle Java 手動安裝與快速安裝程式 (CentOS 6.5 x64)
http://shaurong.blogspot.tw/2013/12/oracle-java-centos-65-x64.html
[root@localhost ~]# ./JDK7U45x64_Install.sh
●安裝 Hadoop (三台都要做)
[root@master01 ~]# wget http://apache.cdpa.nsysu.edu.tw/hadoop/common/hadoop-1.2.1/hadoop-1.2.1-1.x86_64.rpm
[root@master01 ~]# rpm -ivh hadoop-1.2.1-1.x86_64.rpm
檢視現況
[root@master01 ~]# hadoop version
Hadoop 1.2.1
Subversion https://svn.apache.org/repos/asf/hadoop/common/branches/branch-1.2 -r 1503152
Compiled by mattf on Mon Jul 22 15:27:42 PDT 2013
From source with checksum 6923c86528809c4e7e6f493b6b413a9a
This command was run using /usr/share/hadoop/hadoop-core-1.2.1.jar
[root@master01 ~]# cat /etc/passwd | grep Hadoop
mapred:x:202:123:Hadoop MapReduce:/tmp:/bin/bash
hdfs:x:201:123:Hadoop HDFS:/tmp:/bin/bash
[root@master01 ~]# find / -name hadoop
/usr/bin/hadoop
/usr/etc/hadoop
/usr/share/hadoop
/usr/share/doc/hadoop
/usr/include/hadoop
/etc/hadoop
/var/log/hadoop
/var/run/hadoop
/var/lib/hadoop
[root@master01 ~]#
declare -x HADOOP_CLIENT_OPTS="-Xmx128m "
declare -x HADOOP_CONF_DIR="/etc/hadoop"
declare -x HADOOP_IDENT_STRING="root"
declare -x HADOOP_LOG_DIR="/var/log/hadoop/root"
declare -x HADOOP_NAMENODE_OPTS="-Dhadoop.security.logger=INFO,DRFAS -Dhdfs.audit.logger=INFO,DRFAAUDIT "
declare -x HADOOP_OPTS="-Djava.net.preferIPv4Stack=true "
declare -x HADOOP_PID_DIR="/var/run/hadoop"
declare -x HADOOP_SECONDARYNAMENODE_OPTS="-Dhadoop.security.logger=INFO,DRFAS -Dhdfs.audit.logger=INFO,DRFAAUDIT "
declare -x HADOOP_SECURE_DN_LOG_DIR="/var/log/hadoop/"
declare -x HADOOP_SECURE_DN_PID_DIR="/var/run/hadoop"
declare -x HADOOP_SECURE_DN_USER=""
[root@master01 ~]#
[root@master01 ~]# useradd mr
●執行Hadoop設定 (只要 master01 做,稍後會拷貝到另兩台)
其他可以用預設值,但注意最後 Proceed with generate configuration? (y/N) 要輸入 y
[root@master01 ~]# /usr/sbin/hadoop-setup-conf.sh
Setup Hadoop Configuration
Where would you like to put config directory? (/etc/hadoop)
Where would you like to put log directory? (/var/log/hadoop)
Where would you like to put pid directory? (/var/run/hadoop)
What is the host of the namenode? (master01)
Where would you like to put namenode data directory? (/var/lib/hadoop/hdfs/namenode)
Where would you like to put datanode data directory? (/var/lib/hadoop/hdfs/datanode)
What is the host of the jobtracker? (master01)
Where would you like to put jobtracker/tasktracker data directory? (/var/lib/hadoop/mapred)
Where is JAVA_HOME directory? (/usr/java/jdk1.7.0_45)
Would you like to create directories/copy conf files to localhost? (Y/n)
Review your choices:
Config directory : /etc/hadoop
Log directory : /var/log/hadoop
PID directory : /var/run/hadoop
Namenode host : master01
Namenode directory : /var/lib/hadoop/hdfs/namenode
Datanode directory : /var/lib/hadoop/hdfs/datanode
Jobtracker host : master01
Mapreduce directory : /var/lib/hadoop/mapred
Task scheduler : org.apache.hadoop.mapred.JobQueueTaskScheduler
JAVA_HOME directory : /usr/java/jdk1.7.0_45
Create dirs/copy conf files : y
Proceed with generate configuration? (y/N) y
chown: invalid user: `mr:hadoop'
chown: invalid user: `mr:hadoop'
chown: invalid user: `mr:hadoop'
Configuration setup is completed.
Proceed to run hadoop-setup-hdfs.sh on namenode.
[root@master01 ~]#
它幫忙修改下面設定檔案
[root@master01 ~]# ls -al /etc/hadoop/*.xml
-rw-r--r--. 1 root root 6930 Dec 29 12:08 /etc/hadoop/capacity-scheduler.xml
-rw-r--r--. 1 root root 2063 Dec 29 12:08 /etc/hadoop/core-site.xml
-rw-r--r--. 1 root root 327 Jul 23 06:29 /etc/hadoop/fair-scheduler.xml
-rw-r--r--. 1 root root 4653 Dec 29 12:08 /etc/hadoop/hadoop-policy.xml
-rw-r--r--. 1 root root 6589 Dec 29 12:08 /etc/hadoop/hdfs-site.xml
-rw-r--r--. 1 root root 298 Dec 29 12:08 /etc/hadoop/mapred-queue-acls.xml
-rw-r--r--. 1 root root 9589 Dec 29 12:08 /etc/hadoop/mapred-site.xml
[root@master01 ~]#
[root@ master01 ~]# vi /etc/hadoop/masters
master01
[root@ master01 ~]# vi /etc/hadoop/slaves
master01
slave01
slave02
●設定 ssh 連線免輸入密碼(三台都要做)
目的是讓master01能自動連進slave01 ,slave02啟動各台機器的相關服務,如Datanode和task服務
[root@ master01 ~]# yum -y install openssh rsync sshd
[root@ master01 ~]# service sshd restart
[root@ master01 ~]# ssh-keygen -t dsa -P '' -f ~/.ssh/id_dsa
Generating public/private dsa key pair.
Your identification has been saved in /root/.ssh/id_dsa.
Your public key has been saved in /root/.ssh/id_dsa.pub.
The key fingerprint is:
ca:04:30:8d:be:bd:91:a2:c3:c4:94:cf:18:c3:43:cb root@localhost.localdomain
The key's randomart image is:
+--[ DSA 1024]----+
| oo |
| ..o. |
|+.o . |
| E. . |
|o Bo .. S |
| +oo+o . |
|o. . oo |
|o. . |
| . |
+-----------------+
[hadoop@ master01 ~]# cat ~/.ssh/id_dsa.pub >> ~/.ssh/authorized_keys
[hadoop@ master01 ~]# chmod 600 ~/.ssh/authorized_keys
slave01 上也執行
yum -y install openssh rsync sshd
service sshd restart
ssh-keygen -t dsa -P '' -f ~/.ssh/id_dsa
cat ~/.ssh/id_dsa.pub >> ~/.ssh/authorized_keys
chmod 600 ~/.ssh/authorized_keys
slave02 上也執行
yum -y install openssh rsync sshd
service sshd restart
ssh-keygen -t dsa -P '' -f ~/.ssh/id_dsa
cat ~/.ssh/id_dsa.pub >> ~/.ssh/authorized_keys
chmod 600 ~/.ssh/authorized_keys
讓自己 ssh 自己免登入密碼 (三台要各自做,都是連 root@localhost)
第一次執行會問,回答 yes,執行 exit 離開
[root@master01 ~]# ssh root@localhost
The authenticity of host 'localhost (::1)' can't be established.
RSA key fingerprint is 6d:a4:8e:a6:b5:b0:e9:c4:e8:5b:55:be:e4:bd:04:60.
Are you sure you want to continue connecting (yes/no)? yes
Warning: Permanently added 'localhost' (RSA) to the list of known hosts.
Last login: Thu Dec 26 18:30:35 2013 from 192.168.128.1
[root@master01 ~]# exit
logout
Connection to localhost closed.
第二次應該不會問,執行 exit 離開
[root@master01 ~]# ssh root@localhost
Last login: Thu Dec 26 18:31:05 2013 from localhost
[root@master01 ~]# exit
logout
Connection to localhost closed.
[root@master01 ~]#
檢視一下
[root@master01 ~]# cat ~/.ssh/authorized_keys
ssh-dss AAAAB3NzaC1kc3MAAACBAJvVJ7rK7QX2JcAGAwk85l5B7Cm2QUIrQ6RjaSsMDQTZEV6LJ8lWAkdlXIOJhte0EzylPLzxUvckjpr9wEtoZjBjh6i8qklzheQMfLbZUQG3QAxWqeoZYbSdDnoIsHOBSQbckjYiUOvpQECIetiBDQQUdjWglB8jLKWGWa42hUXPAAAAFQDMVDU+CdpFDmp/6PhvBiREpIwHAwAAAIAzXR5aFwO0pUWPAltTwkoruJkiOzl+iC5mrXUJQaEwXXnWJLBYxwLVm/sbNFcMBRLN6+DDp0RoYKe+AIiK51TPVlKGXqfpdPNMkrYYuJronkLGfRg215ko5DCFs/Zz9xsEHfKo48dmn/jy0fySvABwb6LAy3TFYgJBOHpp+lwVtgAAAIBrV22S3BubY4WU2T/BDHY9lfcz4nlSfV5izfjpnAXQ+e5NxD5NlGXmANb6vUcS3z9/dYXpHgAb4ZlpWEYFCLbiALA11fdscHA/bxdYp0nyhHZsZOAZQMR8Hzb6c/xX+btC5+3vmoNsTjhAySmke7SKnQR6yUFvBtjs+D3xvUZc6g== root@master01
[root@master01 ~]# cat ~/.ssh/known_hosts
localhost ssh-rsa AAAAB3NzaC1yc2EAAAABIwAAAQEAnCCNfMSnYd+cqCXPG3d+Okhz7BRxNjPx5dvA5PdeWEHKFvGBgJPX3m8cKMbD5yH9OTUEO9+gaUwSPCzAXFrUIbgEVzHdhVlWHN3MC+qGxp5ZNYf4JbyJzVhH0P5lbOTn6VNfVRJoMf1Ff1+D6OLXJ6vx1ZVpiEBiWZc3szFXvd/BpEazFUaSLhAR3UopKJ2r6GVjnVTpEWHhIs4hkiEHkLPUQfdupRmjZ4QMfoT2PJ36Yc4Xk+z/ShPBQsnrhMJyMwwvkm0WTJKrAGHQxiIzxbE3oPUHc/4n41tD9n1uREsVzILm7mb6VpYAbLSPkeplIqt9DA9itNRwDUjta98Eaw==
(三台要各自做,都是連 root@localhost)
後面那一串亂碼,各台機器上可能不同,你我也可能不同
編輯
[root@master01 ~]# vi ~/.ssh/known_hosts
localhost ssh-rsa AAAAB3NzaC1yc2EAAAABIwAAAQEAnCCNfMSnYd+cqCXPG3d+Okhz7BRxNjPx5dvA5PdeWEHKFvGBgJPX3m8cKMbD5yH9OTUEO9+gaUwSPCzAXFrUIbgEVzHdhVlWHN3MC+qGxp5ZNYf4JbyJzVhH0P5lbOTn6VNfVRJoMf1Ff1+D6OLXJ6vx1ZVpiEBiWZc3szFXvd/BpEazFUaSLhAR3UopKJ2r6GVjnVTpEWHhIs4hkiEHkLPUQfdupRmjZ4QMfoT2PJ36Yc4Xk+z/ShPBQsnrhMJyMwwvkm0WTJKrAGHQxiIzxbE3oPUHc/4n41tD9n1uREsVzILm7mb6VpYAbLSPkeplIqt9DA9itNRwDUjta98Eaw==
內容改成下面 (增加一些主機)
localhost,127.0.0.1,master01,192.168.128.101 ssh-rsa AAAAB3NzaC1yc2EAAAABIwAAAQEAnCCNfMSnYd+cqCXPG3d+Okhz7BRxNjPx5dvA5PdeWEHKFvGBgJPX3m8cKMbD5yH9OTUEO9+gaUwSPCzAXFrUIbgEVzHdhVlWHN3MC+qGxp5ZNYf4JbyJzVhH0P5lbOTn6VNfVRJoMf1Ff1+D6OLXJ6vx1ZVpiEBiWZc3szFXvd/BpEazFUaSLhAR3UopKJ2r6GVjnVTpEWHhIs4hkiEHkLPUQfdupRmjZ4QMfoT2PJ36Yc4Xk+z/ShPBQsnrhMJyMwwvkm0WTJKrAGHQxiIzxbE3oPUHc/4n41tD9n1uREsVzILm7mb6VpYAbLSPkeplIqt9DA9itNRwDUjta98Eaw==
slave01 主機上的 ~/.ssh/known_hosts (注意 IP 和主機名稱不同)
localhost,127.0.0.1,slave01,192.168.128.102 ssh-rsa AAAAB3NzaC1yc2EAAAABIwAAAQEAnCCNfMSnYd+cqCXPG3d+Okhz7BRxNjPx5dvA5PdeWEHKFvGBgJPX3m8cKMbD5yH9OTUEO9+gaUwSPCzAXFrUIbgEVzHdhVlWHN3MC+qGxp5ZNYf4JbyJzVhH0P5lbOTn6VNfVRJoMf1Ff1+D6OLXJ6vx1ZVpiEBiWZc3szFXvd/BpEazFUaSLhAR3UopKJ2r6GVjnVTpEWHhIs4hkiEHkLPUQfdupRmjZ4QMfoT2PJ36Yc4Xk+z/ShPBQsnrhMJyMwwvkm0WTJKrAGHQxiIzxbE3oPUHc/4n41tD9n1uREsVzILm7mb6VpYAbLSPkeplIqt9DA9itNRwDUjta98Eaw==
slave02 主機上的 ~/.ssh/known_hosts (注意 IP 和主機名稱不同)
localhost,127.0.0.1,slave02,192.168.128.103 ssh-rsa AAAAB3NzaC1yc2EAAAABIwAAAQEAnCCNfMSnYd+cqCXPG3d+Okhz7BRxNjPx5dvA5PdeWEHKFvGBgJPX3m8cKMbD5yH9OTUEO9+gaUwSPCzAXFrUIbgEVzHdhVlWHN3MC+qGxp5ZNYf4JbyJzVhH0P5lbOTn6VNfVRJoMf1Ff1+D6OLXJ6vx1ZVpiEBiWZc3szFXvd/BpEazFUaSLhAR3UopKJ2r6GVjnVTpEWHhIs4hkiEHkLPUQfdupRmjZ4QMfoT2PJ36Yc4Xk+z/ShPBQsnrhMJyMwwvkm0WTJKrAGHQxiIzxbE3oPUHc/4n41tD9n1uREsVzILm7mb6VpYAbLSPkeplIqt9DA9itNRwDUjta98Eaw==
● 讓所有 master 用 ssh 連其他 slave 免密碼 (master01 和 slave01,slave02 作法不同)
master01 主機上,把 key 拷貝到 slave01
[root@master01 ~]# scp ~/.ssh/authorized_keys root@slave01:~/.ssh/authorized_keys_from_master01
The authenticity of host 'slave01 (192.168.128.102)' can't be established.
RSA key fingerprint is b5:78:67:c6:4b:29:82:9d:f7:49:e7:02:d9:ec:09:17.
Are you sure you want to continue connecting (yes/no)? yes
Warning: Permanently added 'slave01,192.168.128.102' (RSA) to the list of known hosts.
root@slave01's password:
authorized_keys 100% 611 0.6KB/s 00:00
master01 主機上,把 key 拷貝到 slave02
[root@master01 ~]# scp ~/.ssh/authorized_keys root@slave02:~/.ssh/authorized_keys_from_master01
The authenticity of host 'slave02 (192.168.128.103)' can't be established.
RSA key fingerprint is ac:e1:83:2b:ee:e2:e2:0b:1c:df:06:c7:84:1b:56:de.
Are you sure you want to continue connecting (yes/no)? yes
Warning: Permanently added 'slave02,192.168.128.103' (RSA) to the list of known hosts.
root@slave02's password:
authorized_keys 100% 611 0.6KB/s 00:00
slave01 主機上,把 master01 的 key 放入授權檔案
[root@slave01 ~]# cat ~/.ssh/authorized_keys_from_master01 >> ~/.ssh/authorized_keys
檢視
[root@slave01 ~]# cat ~/.ssh/authorized_keys
ssh-dss AAAAB3NzaC1kc3MAAACBAOYUc5Q7GXnQgHdL3durY297VrEBFrFbTiqNcQoxUjsO1H9exXxU2U06ahcxVGM1sMOqgbTy5aQrNk6P6Lv0f3Lxwks+C07BeY0SBdfmoRotN/8dPb/4Ykk9WSRBo0x7a8HMWqidoVwb73Etsyc10aa0ujP/iwKVhICKY6w3y+IpAAAAFQCT+NAUGf3DhKCUgNBpkVVvWUts7QAAAIBHT4CIqeo2TAKrpF9chXNdd3IklAeidfpwb/p8WGVB0qdrgf8g7OD1E5/ZbSM7aebmbAR9AMGjTi+tcCbmI53JhuHLnMzrmP1P6+BmZxfiq1//GNz2uOsrLZzV4+BLKA7DNYgdeCLV7/GsQX0kc7FZLwK1mtdZVDMI+rOsB/j6sAAAAIEAzBZ3cv9L4qmaY3FoAttr3wbt2c1JJIWFo0CUCc+icDYM8S7jGmVOScfFAg0M81VLJVEli1Tr7/MRFJxEftHRSxEdooUBltRXmx5XjXfEM9tXN/nT9RuSiQop5XCMMSNFVYF/G1XxywyAh7mRvreibG0fxcfyuC2meorqa31PlCU= root@slave01
ssh-dss AAAAB3NzaC1kc3MAAACBAJvVJ7rK7QX2JcAGAwk85l5B7Cm2QUIrQ6RjaSsMDQTZEV6LJ8lWAkdlXIOJhte0EzylPLzxUvckjpr9wEtoZjBjh6i8qklzheQMfLbZUQG3QAxWqeoZYbSdDnoIsHOBSQbckjYiUOvpQECIetiBDQQUdjWglB8jLKWGWa42hUXPAAAAFQDMVDU+CdpFDmp/6PhvBiREpIwHAwAAAIAzXR5aFwO0pUWPAltTwkoruJkiOzl+iC5mrXUJQaEwXXnWJLBYxwLVm/sbNFcMBRLN6+DDp0RoYKe+AIiK51TPVlKGXqfpdPNMkrYYuJronkLGfRg215ko5DCFs/Zz9xsEHfKo48dmn/jy0fySvABwb6LAy3TFYgJBOHpp+lwVtgAAAIBrV22S3BubY4WU2T/BDHY9lfcz4nlSfV5izfjpnAXQ+e5NxD5NlGXmANb6vUcS3z9/dYXpHgAb4ZlpWEYFCLbiALA11fdscHA/bxdYp0nyhHZsZOAZQMR8Hzb6c/xX+btC5+3vmoNsTjhAySmke7SKnQR6yUFvBtjs+D3xvUZc6g== root@master01
兩行的最後分別是 root@slave01 和 root@master01,表示這兩個帳號可以免密碼 ssh 登入
slave02 主機上,把 master01 的 key 放入授權檔案
[root@slave02 ~]# cat ~/.ssh/authorized_keys_from_master01 >> ~/.ssh/authorized_keys
●把 hadoop 設定檔案從 master01 複製拷貝到 slave01, slave02 (只要 master01 做)
[root@master01 ~]# scp /etc/hadoop/* root@192.168.128.102:/etc/hadoop/.
[root@master01 ~]# scp /etc/hadoop/* root@192.168.128.103:/etc/hadoop/.
●格式化分散式檔案系統
[root@master01 ~]# hadoop namenode -format
13/12/29 12:25:39 INFO namenode.NameNode: STARTUP_MSG:
/************************************************************
STARTUP_MSG: Starting NameNode
STARTUP_MSG: host = master01/192.168.128.101
STARTUP_MSG: args = [-format]
STARTUP_MSG: version = 1.2.1
STARTUP_MSG: build = https://svn.apache.org/repos/asf/hadoop/common/branches/branch-1.2 -r 1503152; compiled by 'mattf' on Mon Jul 22 15:27:42 PDT 2013
STARTUP_MSG: java = 1.7.0_45
************************************************************/
13/12/29 12:25:39 INFO util.GSet: Computing capacity for map BlocksMap
13/12/29 12:25:39 INFO util.GSet: VM type = 64-bit
13/12/29 12:25:39 INFO util.GSet: 2.0% max memory = 129761280
13/12/29 12:25:39 INFO util.GSet: capacity = 2^18 = 262144 entries
13/12/29 12:25:39 INFO util.GSet: recommended=262144, actual=262144
13/12/29 12:25:39 INFO namenode.FSNamesystem: fsOwner=root
13/12/29 12:25:39 INFO namenode.FSNamesystem: supergroup=supergroup
13/12/29 12:25:39 INFO namenode.FSNamesystem: isPermissionEnabled=true
13/12/29 12:25:39 INFO namenode.FSNamesystem: dfs.block.invalidate.limit=100
13/12/29 12:25:39 INFO namenode.FSNamesystem: isAccessTokenEnabled=false accessKeyUpdateInterval=0 min(s), accessTokenLifetime=0 min(s)
13/12/29 12:25:39 INFO namenode.FSEditLog: dfs.namenode.edits.toleration.length = 0
13/12/29 12:25:39 INFO namenode.NameNode: Caching file names occuring more than 10 times
13/12/29 12:25:40 INFO common.Storage: Image file /var/lib/hadoop/hdfs/namenode/current/fsimage of size 110 bytes saved in 0 seconds.
13/12/29 12:25:40 INFO namenode.FSEditLog: closing edit log: position=4, editlog=/var/lib/hadoop/hdfs/namenode/current/edits
13/12/29 12:25:40 INFO namenode.FSEditLog: close success: truncate to 4, editlog=/var/lib/hadoop/hdfs/namenode/current/edits
13/12/29 12:25:40 INFO common.Storage: Storage directory /var/lib/hadoop/hdfs/namenode has been successfully formatted.
13/12/29 12:25:40 INFO namenode.NameNode: SHUTDOWN_MSG:
/************************************************************
SHUTDOWN_MSG: Shutting down NameNode at master01/192.168.128.101
************************************************************/
[root@master01 ~]#
●測試啟動各項Hadoop服務(三台)
(偷懶一點就各項服務的測試跳過,等 start-all.sh 發現異常再測試)
測試啟動和停止 Namenode
小弟經驗,不管用 hadoop-daemon.sh 或 start-all.sh 或 stop-all.sh 去啟動或停止,
就算告訴你成功,都沒有 100% 可靠,最好用 ps 檢查
[root@master01 hadoop]# /usr/sbin/hadoop-daemon.sh start namenode
starting namenode, logging to /var/log/hadoop/root/hadoop-root-namenode-master01.out
[root@master01 sbin]# ps aux | grep hadoop | awk '{print $1 "\t" $2 "\t" $11 "\t" $12}'
root 34233 /usr/java/jdk1.7.0_45/bin/java -Dproc_namenode
root 34297 grep hadoop
為了避免麻煩,可以建立一個 hs.sh 專門執行這串複雜指令
[root@master01 hadoop]# vi /usr/bin/hs.sh
內容
ps aux | grep hadoop | awk '{print $1 "\t" $2 "\t" $11 "\t" $12}'
設定成可執行
[root@master01 hadoop]# chmod +x /usr/bin/hs.sh
或
[root@master01 ~]# jps
5267 JobTracker
29599 Jps
5394 TaskTracker
5047 DataNode
4927 NameNode
5174 SecondaryNameNode
[root@master01 ~]# find / -name jps
/usr/java/jdk1.7.0_45/bin/jps
stopping namenode
測試啟動和停止 Datanode
[root@master01 hadoop]# /usr/sbin/hadoop-daemon.sh start datanode
starting datanode, logging to /var/log/hadoop/root/hadoop-root-datanode-master01.out
[root@master01 sbin]# ps aux | grep hadoop | awk '{print $1 "\t" $2 "\t" $11 "\t" $12}'
root 34327 /usr/java/jdk1.7.0_45/bin/java -Dproc_datanode
root 34392 grep hadoop
[root@master01 hadoop]# /usr/sbin/hadoop-daemon.sh stop datanode
stopping datanode
測試啟動和停止 jobtracker
[root@master01 hadoop]# /usr/sbin/hadoop-daemon.sh start jobtracker
starting jobtracker, logging to /var/log/hadoop/root/hadoop-root-jobtracker-master01.out
[root@master01 sbin]# ps aux | grep hadoop | awk '{print $1 "\t" $2 "\t" $11 "\t" $12}'
root 34424 /usr/java/jdk1.7.0_45/bin/java -Dproc_jobtracker
root 34497 grep hadoop
[root@master01 hadoop]# /usr/sbin/hadoop-daemon.sh stop jobtracker
stopping jobtracker
測試啟動和停止 tasktracker
[root@master01 hadoop]# /usr/sbin/hadoop-daemon.sh start tasktracker
starting tasktracker, logging to /var/log/hadoop/root/hadoop-root-tasktracker-master01.out
[root@master01 ~]# ps aux | grep hadoop | awk '{print $1 "\t" $2 "\t" $11 "\t" $12}'
root 34119 /usr/java/jdk1.7.0_45/bin/java -Dproc_tasktracker
root 34169 grep hadoop
[root@master01 hadoop]# /usr/sbin/hadoop-daemon.sh stop tasktracker
stopping tasktracker
全部測試成功之後測試啟動全部服務
避免防火牆問題,先停掉它
[root@master01 ~]# service iptables stop
[root@slave01 ~]# service iptables stop
[root@slave02 ~]# service iptables stop
[root@master01 ~]# chkconfig iptables off
[root@slave01 ~]# chkconfig iptables off
[root@slave02 ~]# chkconfig iptables off
[root@master01 ~]# chmod +x /usr/sbin/*.sh
[root@slave01 ~]# chmod +x /usr/sbin/*.sh
[root@slave02 ~]# chmod +x /usr/sbin/*.sh
●啟動 hadoop cluster (只要 master01 做,會自動啟動 slave01 和 slave02)
[root@master01 ~]# start-all.sh
starting namenode, logging to /var/log/hadoop/root/hadoop-root-namenode-master01.out
slave01: starting datanode, logging to /var/log/hadoop/root/hadoop-root-datanode-slave01.out
slave02: starting datanode, logging to /var/log/hadoop/root/hadoop-root-datanode-slave02.out
master01: starting datanode, logging to /var/log/hadoop/root/hadoop-root-datanode-master01.out
master01: starting secondarynamenode, logging to /var/log/hadoop/root/hadoop-root-secondarynamenode-master01.out
starting jobtracker, logging to /var/log/hadoop/root/hadoop-root-jobtracker-master01.out
slave01: starting tasktracker, logging to /var/log/hadoop/root/hadoop-root-tasktracker-slave01.out
slave02: starting tasktracker, logging to /var/log/hadoop/root/hadoop-root-tasktracker-slave02.out
master01: starting tasktracker, logging to /var/log/hadoop/root/hadoop-root-tasktracker-master01.out
master01 上檢查
[root@master01 ~]# hs.sh
root 3330 /usr/java/jdk1.7.0_45/bin/java -Dproc_namenode
root 3449 /usr/java/jdk1.7.0_45/bin/java -Dproc_datanode
root 3575 /usr/java/jdk1.7.0_45/bin/java -Dproc_secondarynamenode
root 3667 /usr/java/jdk1.7.0_45/bin/java -Dproc_jobtracker
root 3792 /usr/java/jdk1.7.0_45/bin/java -Dproc_tasktracker
root 3843 grep hadoop
[root@master01 ~]#
slave01 上檢查
[root@slave01 ~]# hs.sh
root 2456 /usr/java/jdk1.7.0_45/bin/java -Dproc_datanode
root 2551 /usr/java/jdk1.7.0_45/bin/java -Dproc_tasktracker
root 2623 grep hadoop
[root@slave01 ~]#
slave02 上檢查
[root@slave02 ~]# hs.sh
root 2456 /usr/java/jdk1.7.0_45/bin/java -Dproc_datanode
root 2551 /usr/java/jdk1.7.0_45/bin/java -Dproc_tasktracker
root 2623 grep hadoop
[root@slave02 ~]#
●測試Hadoop網頁管理功能
測試HSDF網頁管理介面
http://192.168.128.101:50070
(下圖) 按下上圖中 Browse the filesystem 超連結後 (疑似有問題,待查)
(下圖) 按下第一張圖中 Live Nodes 超連結後

(下圖) 按下第一張圖中 Dead Nodes 超連結後
(下圖) 按下第一張圖中 Decommissioning Nodes 超連結後
(下圖) 測試MapReduce網頁管理介面
http://192.168.128.101:50030


(下圖) 按下上圖中 default 超連結的畫面

停止
[root@master01 ~]# /usr/sbin/stop-all.sh
stopping jobtracker
slave01: stopping tasktracker
slave02: stopping tasktracker
master01: stopping tasktracker
stopping namenode
slave01: stopping datanode
master01: stopping datanode
slave02: stopping datanode
master01: stopping secondarynamenode
[root@master01 ~]#
(完)
相關
[研究] Hadoop 2.2.0 Cluster 安裝 (CentOS 6.5 x64)
http://shaurong.blogspot.tw/2013/12/hadoop-220-cluster-centos-65-x64.html
[研究] Hadoop 1.2.1 Cluster 安裝 (CentOS 6.5 x64)
http://shaurong.blogspot.tw/2013/12/hadoop-121-cluster-centos-65-x64_29.html
[研究] Hadoop 2.2.0 編譯 (CentOS 6.4 x64)
http://shaurong.blogspot.tw/2013/11/hadoop-220-centos-64-x64.html
[研究] Hadoop 2.2.0 Single Cluster 安裝 (二)(CentOS 6.4 x64)
http://shaurong.blogspot.tw/2013/11/hadoop-220-single-cluster-centos-64-x64_7.html
[研究] Hadoop 2.2.0 Single Cluster 安裝 (一)(CentOS 6.4 x64)
http://shaurong.blogspot.tw/2013/11/hadoop-220-single-cluster-centos-64-x64.html
[研究] Hadoop 1.2.1 (rpm)安裝 (CentOS 6.4 x64)
http://shaurong.blogspot.tw/2013/10/hadoop-121-rpm-centos-64-x64.html
[研究] Hadoop 1.2.1 (bin)安裝 (CentOS 6.4 x64)
http://shaurong.blogspot.tw/2013/07/hadoop-112-centos-64-x64.html
[研究] Hadoop 1.2.1 安裝 (CentOS 6.4 x64)
http://forum.icst.org.tw/phpbb/viewtopic.php?t=80035
[研究] 雲端軟體 Hadoop 1.0.0 安裝 (CentOS 6.2 x86)
http://forum.icst.org.tw/phpbb/viewtopic.php?t=21166
[研究] 雲端軟體 Hadoop 0.20.2 安裝 (CentOS 5.5 x86)
http://forum.icst.org.tw/phpbb/viewtopic.php?t=18513
[研究] 雲端軟體 Hadoop 0.20.2 安裝 (CentOS 5.4 x86)
http://forum.icst.org.tw/phpbb/viewtopic.php?t=17974
訂閱:
文章 (Atom)