[研究] 2主機 MySQL Cluster 7.2.10-1 架設
2013-02-06
Lu
上次安裝測試的MySQL Cluster 7.0.9 似乎是修改自 MySQL 5.1,這次安裝測試的 MySQL Cluster 7.2.10 是修改自 MySQL 5.5,一些套件整併了,某些舊套件不存在了。
建議學2主機架設前,先學4主機架設。而且實務上不建議如本實驗中兩台都安裝 MGM + SQL + Data Node,狀況很多。
參考文件
Chapter 17. MySQL Cluster NDB 7.2
http://dev.mysql.com/doc/refman/5.5/en/mysql-cluster.html
http://dev.mysql.com/doc/refman/5.5/en/mysql-cluster-install-linux-rpm.html
[研究] 4主機 MySQL Cluster 7.2.10.1 架設
http://shaurong.blogspot.tw/2013/02/4-mysql-cluster-7210-1.html
[研究] 4主機 MySQL Cluster 7.0.9 架設
http://forum.icst.org.tw/phpbb/viewtopic.php?f=10&t=17903
[研究] 雙主機 MySQL Cluster 7.0.9架設
http://forum.icst.org.tw/phpbb/viewtopic.php?f=10&t=17904
---------------------------------------------------------------------------
一、概念說明
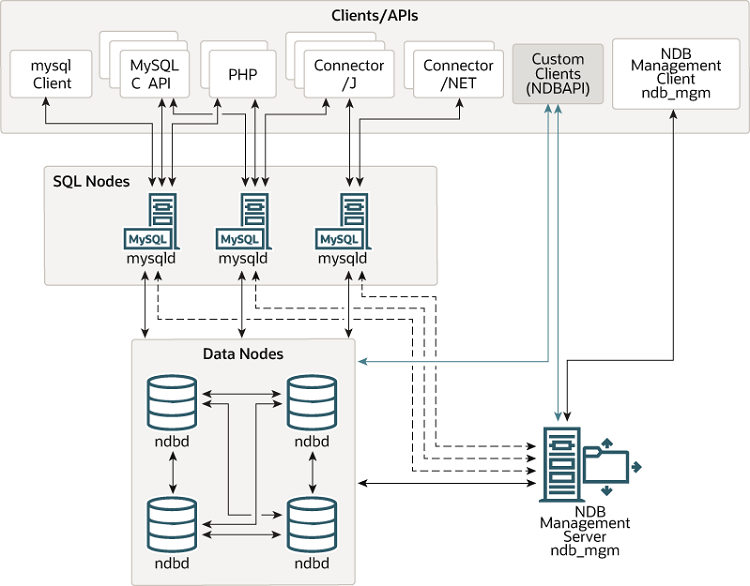
MySQL Cluster(叢集,大陸稱為 "集群" 或 "群集") 架構大致如下,此為官方網站的圖片,網址
http://dev.mysql.com/doc/refman/5.5/en/images/cluster-components-1.png

NDB 是 Network DataBase (網路資料庫)
MySQL Cluster中主機分三類
1. 管理主機 : 服務程式(Deamon) 稱為 ndb_mgmd (NDB Management Daemon的意思)
管理工具稱為 ndb_mgm (NDB Management 的意思),預設使用 Port 1186。
2. Data Node: 實際存放資料的主機 (Storage),服務程式稱為 ndbd (NDB Daemon的意思)。
3. SQL Node : 提供存取資料庫內容,服務程式稱為 mysqld (MySQL Deamon的意思)。
---------------------------------------------------------------------------
二、環境
Windows 2008 R2 + VMware Workstation 9.0.1 架設4台 VM,都安裝 CentOS 6.3 x64
centos1 eth0:192.168.128.101 (MGM Node + SQL Node + Data Node) 主機名稱 centos1
centos2 eth0:192.168.128.102 (MGM Node + SQL Node + Data Node) 主機名稱 centos2
CentOS 6.3 x64 在 600MB,無法用圖形模式安裝,也不會安裝 X Window
CentOS 6.3 x64 在 640MB,可用圖形模式安裝,會安裝 X Window
CentOS 6.3 x86 在 512MB,無法用圖形模式安裝,也不會安裝 X Window
VM 種類選 Red Hat Enterprise Linux 6 64-bit,記憶體設 640 MB
( 其實不管選 Red Hat Enterprise Linux 6 或 Red Hat Enterprise Linux 6 64-bit,VMware Workstation 9.0.1 建議的 RAM 是 2048 MB,但是小弟電腦總共只有 4GB )
---------------------------------------------------------------------------
三、套件下載
套件下載 (免費註冊登入後才能下載)
http://dev.mysql.com/downloads/cluster/#downloads
http://dev.mysql.com/get/Downloads/MySQL-Cluster-7.2/MySQL-Cluster-test-gpl-7.2.10-1.el6.x86_64.rpm/from/http://cdn.mysql.com/
http://dev.mysql.com/get/Downloads/MySQL-Cluster-7.2/MySQL-Cluster-test-gpl-7.2.10-1.el6.i686.rpm/from/http://cdn.mysql.com/
http://dev.mysql.com/get/Downloads/MySQL-Cluster-7.2/MySQL-Cluster-shared-gpl-7.2.10-1.el6.x86_64.rpm/from/http://cdn.mysql.com/
http://dev.mysql.com/get/Downloads/MySQL-Cluster-7.2/MySQL-Cluster-shared-gpl-7.2.10-1.el6.i686.rpm/from/http://cdn.mysql.com/
http://dev.mysql.com/get/Downloads/MySQL-Cluster-7.2/MySQL-Cluster-shared-compat-gpl-7.2.10-1.el6.x86_64.rpm/from/http://cdn.mysql.com/
http://dev.mysql.com/get/Downloads/MySQL-Cluster-7.2/MySQL-Cluster-shared-compat-gpl-7.2.10-1.el6.i686.rpm/from/http://cdn.mysql.com/
http://dev.mysql.com/get/Downloads/MySQL-Cluster-7.2/MySQL-Cluster-server-gpl-7.2.10-1.el6.x86_64.rpm/from/http://cdn.mysql.com/
http://dev.mysql.com/get/Downloads/MySQL-Cluster-7.2/MySQL-Cluster-server-gpl-7.2.10-1.el6.i686.rpm/from/http://cdn.mysql.com/
http://dev.mysql.com/get/Downloads/MySQL-Cluster-7.2/MySQL-Cluster-embedded-gpl-7.2.10-1.el6.x86_64.rpm/from/http://cdn.mysql.com/
http://dev.mysql.com/get/Downloads/MySQL-Cluster-7.2/MySQL-Cluster-embedded-gpl-7.2.10-1.el6.i686.rpm/from/http://cdn.mysql.com/
http://dev.mysql.com/get/Downloads/MySQL-Cluster-7.2/MySQL-Cluster-devel-gpl-7.2.10-1.el6.x86_64.rpm/from/http://cdn.mysql.com/
http://dev.mysql.com/get/Downloads/MySQL-Cluster-7.2/MySQL-Cluster-devel-gpl-7.2.10-1.el6.i686.rpm/from/http://cdn.mysql.com/
http://dev.mysql.com/get/Downloads/MySQL-Cluster-7.2/MySQL-Cluster-client-gpl-7.2.10-1.el6.x86_64.rpm/from/http://cdn.mysql.com/
http://dev.mysql.com/get/Downloads/MySQL-Cluster-7.2/MySQL-Cluster-client-gpl-7.2.10-1.el6.i686.rpm/from/http://cdn.mysql.com/
因為要登入後才能下載,下載速度請別太低,一旦登入時間 time out,下載會自動中斷
小弟下載的環境限制每個下載 session 只有 500 Kbits/s,下載最大的兩個檔案很容易發生下載被中斷的情況
MySQL-Cluster-server-gpl-7.2.10-1.el6.x86_64.rpm
MySQL-Cluster-server-gpl-7.2.10-1.el6.i686.rpm

下載後,可用 WinSCP 丟到 VM 中;或用 UltraISO 做成 .iso 檔案,掛載到 VMware 光碟機,然後用 mount 掛載到 Linux 上的 /media 目錄使用
---------------------------------------------------------------------------
四、安裝
為了省麻煩,防火牆先關閉,請把 SELinux 也關閉
要立刻關閉 SELinux (但 reboot 後仍會開啟)可執行 /usr/sbin/setenforce 0
要永久關閉,請修改 /etc/selinux/config
把 SELINUX=enforcing 改為 SELINUX=disabled
此修改不會立刻生效,要 reboot 才有效
CentOS 用 yum 安裝的 MySQL 是不能架設 Cluster 的,必須移除,
然後去 MySQL 官方網站註冊和下載 MySQL Cluster 使用的套件
(rpm 安裝和 tar.gz 安裝的很多路徑不同,如果使用非 rpm 請自己另外研究)
| /usr/sbin/setenforce 0 sed -i -e "s@SELINUX=enforcing@#SELINUX=enforcing@" /etc/selinux/config sed -i -e "s@SELINUX=permissive@#SELINUX=permissive@" /etc/selinux/config sed -i -e "/SELINUX=/aSELINUX=disabled" /etc/selinux/config service iptables stop yum -y remove mysql* |
各Node基本需要的套件如下
MGM Node
| rpm -Uhv MySQL-Cluster-server-gpl-7.2.10-1.el6.x86_64.rpm |
SQL Node
| rpm -Uhv MySQL-Cluster-server-gpl-7.2.10-1.el6.x86_64.rpm rpm -Uhv MySQL-Cluster-client-gpl-7.2.10-1.el6.x86_64.rpm |
Data Node
| rpm -Uhv MySQL-Cluster-server-gpl-7.2.10-1.el6.x86_64.rpm |
安裝情況
| [root@localhost ~]# rpm -Uhv MySQL-Cluster-server-gpl-7.2.10-1.el6.x86_64.rpm Preparing... ########################################### [100%] 1:MySQL-Cluster-server-gp########################################### [100%] PLEASE REMEMBER TO SET A PASSWORD FOR THE MySQL root USER ! To do so, start the server, then issue the following commands: /usr/bin/mysqladmin -u root password 'new-password' /usr/bin/mysqladmin -u root -h localhost.localdomain password 'new-password' Alternatively you can run: /usr/bin/mysql_secure_installation which will also give you the option of removing the test databases and anonymous user created by default. This is strongly recommended for production servers. See the manual for more instructions. Please report any problems with the /usr/bin/mysqlbug script! [root@localhost ~]# rpm -Uhv MySQL-Cluster-client-gpl-7.2.10-1.el6.x86_64.rpm Preparing... ########################################### [100%] 1:MySQL-Cluster-client-gp########################################### [100%] |
五、設定
參考
17.2.3. Initial Configuration of MySQL Cluster
http://dev.mysql.com/doc/refman/5.5/en/mysql-cluster-install-configuration.html
17.3.2.1. MySQL Cluster Configuration: Basic Example
http://dev.mysql.com/doc/refman/5.5/en/mysql-cluster-config-example.html
(1) 設定 my.cnf (mysqld及ndbd、ndb_mgmd均使用它)
這裡有 my.cnf 的基本範例
http://dev.mysql.com/doc/refman/5.5/en/mysql-cluster-config-example.html
| vi /etc/my.cnf |
內容 (要把 IP 改為自己環境的
| [mysqld] ndbcluster ndb-connectstring=192.168.128.101,192.168.128.102 # provide connectstring for management server host (default port: 1186) [ndbd] ndb-connectstring=192.168.128.101,192.168.128.102 # provide connectstring for management server host (default port: 1186) [ndb_mgm] ndb-connectstring=192.168.128.101,192.168.128.102 # provide location of cluster configuration file [ndb_mgmd] config-file=/var/lib/mysql-cluster/config.ini |
(2) 設定 MGM Node 設定檔 config.ini
| mkdir /var/lib/mysql-cluster vi /var/lib/mysql-cluster/config.ini |
內容 (要把 IP 改為自己環境的
| [ndbd default] Hostname =192.168.128.101 [ndb_mgmd default] Hostname =192.168.128.101 [ndb_mgmd] Hostname =192.168.128.101 [ndb_mgmd] Hostname =192.168.128.102 [ndbd] Hostname=192.168.128.101 [ndbd] Hostname=192.168.128.102 [mysqld] Hostname=192.168.128.101 [mysqld] Hostname=192.168.128.102 [mysqld] [mysqld] |
這裡設定了兩個 MGM Node,2個 Data Node (ndbd),4個 SQL Node (mysqld)
---------------------------------------------------------------------------
六、啟動
17.2.4. Initial Startup of MySQL Cluster
http://dev.mysql.com/doc/refman/5.5/en/mysql-cluster-install-first-start.html
啟動 MySQL Cluster 順序: 首先啟動管理節點服務器(ndb_mgmd),然後啟動存儲節點服務器(ndbd),最後才啟動SQL節點服務器(service mysql start)
(1) 啟動 MGM Node
| [root@centos1 ~]# ndb_mgmd --initial --ndb-nodeid=1 MySQL Cluster Management Server mysql-5.5.29 ndb-7.2.10 2013-02-08 19:50:46 [MgmtSrvr] INFO -- The default config directory '/usr/mysql-cluster' does not exist. Trying to create it... 2013-02-08 19:50:46 [MgmtSrvr] INFO -- Sucessfully created config directory 2013-02-08 19:50:46 [MgmtSrvr] WARNING -- at line 19: Cluster configuration warning: arbitrator with id 1 and db node with id 3 on same host 192.168.128.101 arbitrator with id 2 and db node with id 4 on same host 192.168.128.102 Running arbitrator on the same host as a database node may cause complete cluster shutdown in case of host failure.
[root@centos1 ~]# ndb_mgm -e show
Connected to Management Server at: 192.168.128.101:1186
Cluster Configuration
---------------------
[ndbd(NDB)] 2 node(s)
id=3 (not connected, accepting connect from 192.168.128.101)
id=4 (not connected, accepting connect from 192.168.128.102)
[ndb_mgmd(MGM)] 2 node(s)
id=1 @192.168.128.101 (mysql-5.5.29 ndb-7.2.10)
id=2 @192.168.128.102 (mysql-5.5.29 ndb-7.2.10)
[mysqld(API)] 4 node(s)
id=5 (not connected, accepting connect from 192.168.128.101)
id=6 (not connected, accepting connect from 192.168.128.102)
id=7 (not connected, accepting connect from any host)
id=8 (not connected, accepting connect from any host)
|
上面可以看到各 Node 的 id 編號,稍後在啟動 Node 時候會用到,請依自己的情況修改執行的指令。
--initial 表示重新讀取 config.ini 設定,並且啟動管理服務;如果 config.ini 修改過,必須加上此參數,否則可以不用加上此參數。
--ndb-nodeid=1 表示掛載在 ID=1 的 Node 上,基本上可以不加,但若啟動時無法自動判斷時,必須加上。
有一個警告提示說arbitrator(仲裁人)發現不同node在相同主機上,可能引起整個叢集失敗,MGM Node 和 Data Node 可能無法在同一台上。(或許 MGM 和 Data Node 在不同機器上就可以正常,但是 Data Node 只有一台沒甚麼好玩,這樣就至少要 3 台了)
MGM Node 如果不只一台時,它會嘗試連另外一台 MGM,連不上則會錯誤。
有時候 ndb_mgm -e show 會無法順利顯示狀況,如下,必須等另一台 MGM 啟動
| [root@centos1 ~]# ndb_mgm -e show Connected to Management Server at: 192.168.128.101:1186 ERROR Message: The cluster configuration is not yet confirmed by all defined management servers. This management server is still waiting for node 2 to connect. Could not get configuration * 4012: Failed to get configuration * The cluster configuration is not yet confirmed by all defined management servers. This management server is still waiting for node 2 to connect. |
另一台上
| [root@centos2 ~]# ndb_mgmd --initial --ndb-nodeid=2 MySQL Cluster Management Server mysql-5.5.29 ndb-7.2.10 2013-02-08 19:56:12 [MgmtSrvr] WARNING -- at line 19: Cluster configuration warning: arbitrator with id 1 and db node with id 3 on same host 192.168.128.101 arbitrator with id 2 and db node with id 4 on same host 192.168.128.102 Running arbitrator on the same host as a database node may cause complete cluster shutdown in case of host failure. [root@centos2 ~]# ndb_mgm -e show Connected to Management Server at: 192.168.128.101:1186 Cluster Configuration --------------------- [ndbd(NDB)] 2 node(s) id=3 (not connected, accepting connect from 192.168.128.101) id=4 (not connected, accepting connect from 192.168.128.102) [ndb_mgmd(MGM)] 2 node(s) id=1 @192.168.128.101 (mysql-5.5.29 ndb-7.2.10) id=2 @192.168.128.102 (mysql-5.5.29 ndb-7.2.10) [mysqld(API)] 4 node(s) id=5 (not connected, accepting connect from 192.168.128.101) id=6 (not connected, accepting connect from 192.168.128.102) id=7 (not connected, accepting connect from any host) id=8 (not connected, accepting connect from any host) [root@centos2 ~]# |
如果啟動不順利,或要修改 config.ini,請執行ndb_mgm -e showdown,它會把所有 MGM Node 和所有 Data Node 的 ndb_mgmd 和 ndbd 都停止掉。
請在每台主機上執行 ps aux | grep ndb 確認停止情況,因為管理功能若異常,可能會發生某些 MGM 主機上的 ndb_mgmd 仍在執行的情形。
此時只能用 kill -9 強行中斷執行,例如:
| [root@centos1 ~]# ps aux | grep ndb root 2194 0.5 2.7 579412 17104 ? Ssl 19:50 0:03 ndb_mgmd --initial --ndb-nodeid=1 root 2232 0.0 0.1 103232 864 pts/0 S+ 19:59 0:00 grep ndb |
| [root@localhost ~]# mkdir -p /usr/local/mysql/data/ [root@localhost ~]# ndbd 2013-02-07 22:13:02 [ndbd] INFO -- Angel connected to '192.168.128.101:1186' 2013-02-07 22:13:07 [ndbd] INFO -- Angel allocated nodeid: 3 [root@localhost ~]# |
(2) 啟動 Data Node
根據上面 ndb_mgm -e show 執行結果,Data Node 的 id 分別有 3 和 4
在 centos1 主機上執行
| [root@centos1 ~]# ndbd --ndb-nodeid=3 --initial 2013-02-08 20:00:15 [ndbd] INFO -- Angel connected to '192.168.128.101:1186' 2013-02-08 20:00:15 [ndbd] INFO -- Angel allocated nodeid: 3 |
在 centos2 主機上執行
| [root@centos2 ~]# ndbd --ndb-nodeid=4 --initial 2013-02-08 20:01:23 [ndbd] INFO -- Angel connected to '192.168.128.101:1186' 2013-02-08 20:01:23 [ndbd] INFO -- Angel allocated nodeid: 4 |
在任意一台 MGM 主機上檢查狀態
| [root@centos2 ~]# ndb_mgm -e showndb_mgm -e show Connected to Management Server at: 192.168.128.101:1186 Cluster Configuration --------------------- [ndbd(NDB)] 2 node(s) id=3 @192.168.128.101 (mysql-5.5.29 ndb-7.2.10, starting, Nodegroup: 0, Master) id=4 @192.168.128.102 (mysql-5.5.29 ndb-7.2.10, starting, Nodegroup: 0) [ndb_mgmd(MGM)] 2 node(s) id=1 @192.168.128.101 (mysql-5.5.29 ndb-7.2.10) id=2 @192.168.128.102 (mysql-5.5.29 ndb-7.2.10) [mysqld(API)] 4 node(s) id=5 (not connected, accepting connect from 192.168.128.101) id=6 (not connected, accepting connect from 192.168.128.102) id=7 (not connected, accepting connect from any host) id=8 (not connected, accepting connect from any host) |
可以發現 id=3 和 id=4 各有一台主機連上。
(3) 啟動 SQL Node
根據上面 ndb_mgm -e show 執行結果,SQL Node 的 id 分別有 5, 6, 7, 8
在 centos1 主機上執行
| [root@centos1 ~]# service mysql start Starting MySQL.... SUCCESS! |
或用下面方式執行
| [root@centos1 ~]# mysqld_safe --ndb-nodeid=5 --user=mysql & [1] 2287 [root@centos1 ~]# 130208 20:06:32 mysqld_safe Logging to '/var/lib/mysql/centos1.err'. 130208 20:06:32 mysqld_safe Starting mysqld daemon with databases from /var/lib/mysql [root@centos1 ~]# ps aux | grep mysql root 2502 0.0 0.2 11296 1516 pts/0 S 20:20 0:00 /bin/sh /usr/bin/mysqld_safe --datadir=/var/lib/mysql --pid-file=/var/lib/mysql/centos1.pid mysql 2617 0.6 8.8 898132 54924 pts/0 Sl 20:20 0:01 /usr/sbin/mysqld --basedir=/usr --datadir=/var/lib/mysql --plugin-dir=/usr/lib64/mysql/plugin --user=mysql --log-error=/var/lib/mysql/centos1.err --pid-file=/var/lib/mysql/centos1.pid root 2724 0.0 0.1 103232 864 pts/0 S+ 20:23 0:00 grep mysql [root@centos1 ~]# |
在 centos2 主機上執行
| [root@centos2 ~]# service mysql start Starting MySQL.... SUCCESS! |
或用下面方式執行
| [root@centos2 ~]# mysqld_safe --ndb-nodeid=6 --user=mysql & [1] 2282 [root@centos2 ~]# 130208 20:07:15 mysqld_safe Logging to '/var/lib/mysql/centos2.err'. 130208 20:07:15 mysqld_safe Starting mysqld daemon with databases from /var/lib/mysql |
執行 ps 檢查狀態
| [root@centos1 ~]# ps aux | grep mysql |
檢查目前狀況
| [root@centos2 ~]# ndb_mgm -e show Connected to Management Server at: 192.168.128.101:1186 Cluster Configuration --------------------- [ndbd(NDB)] 2 node(s) id=3 @192.168.128.101 (mysql-5.5.29 ndb-7.2.10, Nodegroup: 0, Master) id=4 @192.168.128.102 (mysql-5.5.29 ndb-7.2.10, Nodegroup: 0) [ndb_mgmd(MGM)] 2 node(s) id=1 @192.168.128.101 (mysql-5.5.29 ndb-7.2.10) id=2 @192.168.128.102 (mysql-5.5.29 ndb-7.2.10) [mysqld(API)] 4 node(s) id=5 @192.168.128.101 (mysql-5.5.29 ndb-7.2.10) id=6 @192.168.128.102 (mysql-5.5.29 ndb-7.2.10) id=7 (not connected, accepting connect from any host) id=8 (not connected, accepting connect from any host) |
SQL Node 也掛上了。
(4) 停止 (先不要操作)
停止 MySQL Cluster : 執行
| ndb_mgm -e shutdown |
它會把所有 MGM Node 和所有 Data Node 的 ndb_mgmd 和 ndbd 都停止掉。(mysqld 還留著)
| [root@localhost mysql-cluster]# ndb_mgm -e SHUTDOWN Connected to Management Server at: localhost:1186 3 NDB Cluster node(s) have shutdown. Disconnecting to allow management server to shutdown. [root@localhost mysql-cluster]# |
在 SQL Node 上停止 mysqld 服務命令為 (其實 ndb_mgm -e showdown 就足夠讓 Cluster 幾乎停工)
| [root@centos1 ~]# mysqladmin -u root shutdown |
七.測試:
(1) 在 centos1 寫入,在 centos2 可讀到資料
在 centos1 主機建立 db1 資料庫和 table1 資料表
(稍後的備份還原測試要用,請不要只建立資料庫)
| [root@centos1 ~]# mysql -e "create database db1; show databases;" +--------------------+ | Database | +--------------------+ | information_schema | | db1 | | mysql | | ndbinfo | | performance_schema | | test | +--------------------+ [root@centos1 ~]# mysql -e "use db1; create table table1 (name varchar(10)); show tables;" +---------------+ | Tables_in_db1 | +---------------+ | table1 | +---------------+ |
在 centos2 看看可否讀取到
| [root@centos2 ~]# mysql Welcome to the MySQL monitor. Commands end with ; or \g. Your MySQL connection id is 2 Server version: 5.5.29-ndb-7.2.10-cluster-gpl MySQL Cluster Community Server (GPL) Copyright (c) 2000, 2012, Oracle and/or its affiliates. All rights reserved. Oracle is a registered trademark of Oracle Corporation and/or its affiliates. Other names may be trademarks of their respective owners. Type 'help;' or '\h' for help. Type '\c' to clear the current input statement. mysql> show databases; +--------------------+ | Database | +--------------------+ | information_schema | | db1 | | mysql | | ndbinfo | | performance_schema | | test | +--------------------+ 6 rows in set (0.20 sec) mysql> use db1; Database changed mysql> show tables; Empty set (0.03 sec) |
結果 Database 在另一台上有產生,但是 Table 沒有產生,10分鐘後測試仍是沒有,應該是不會產生了。
(2) 資料庫備份測試
[root@centos1 ~]# ndb_mgm
-- NDB Cluster -- Management Client --
ndb_mgm> start backup
Connected to Management Server at: 192.168.128.101:1186
Waiting for completed, this may take several minutes
Node 3: Backup 1 started from node 1
Node 3: Backup 1 started from node 1 completed
StartGCP: 587 StopGCP: 590
#Records: 2056 #LogRecords: 0
Data: 50920 bytes Log: 0 bytes
ndb_mgm>
|
備份的結果是在每個 Data Node 都產生一個備份,用ll命令分別在兩台主機上檢查看看
[root@centos1 ~]# ls -alR /root/BACKUP
/root/BACKUP:
total 12
drwxr-x---. 3 root root 4096 Feb 8 20:22 .
dr-xr-x---. 7 root root 4096 Feb 8 20:22 ..
drwxr-x---. 2 root root 4096 Feb 8 20:22 BACKUP-1
/root/BACKUP/BACKUP-1:
total 60
drwxr-x---. 2 root root 4096 Feb 8 20:22 .
drwxr-x---. 3 root root 4096 Feb 8 20:22 ..
-rw-r--r--. 1 root root 26016 Feb 8 20:22 BACKUP-1-0.3.Data
-rw-r--r--. 1 root root 20344 Feb 8 20:22 BACKUP-1.3.ctl
-rw-r--r--. 1 root root 52 Feb 8 20:22 BACKUP-1.3.log
|
另一台上
| [root@centos2 ~]# ls -laR /root/BACKUP/ /root/BACKUP/: total 12 drwxr-x---. 3 root root 4096 Feb 8 20:22 . dr-xr-x---. 7 root root 4096 Feb 8 20:27 .. drwxr-x---. 2 root root 4096 Feb 8 20:22 BACKUP-1 /root/BACKUP/BACKUP-1: total 60 drwxr-x---. 2 root root 4096 Feb 8 20:22 . drwxr-x---. 3 root root 4096 Feb 8 20:22 .. -rw-r--r--. 1 root root 25392 Feb 8 20:22 BACKUP-1-0.4.Data -rw-r--r--. 1 root root 20344 Feb 8 20:22 BACKUP-1.4.ctl -rw-r--r--. 1 root root 52 Feb 8 20:22 BACKUP-1.4.log |
第一次備份時候可以不加上 Backup ID,第二次不加上會產生下面錯誤
| [root@centos1 ~]# ndb_mgm -- NDB Cluster -- Management Client -- ndb_mgm> start backup Connected to Management Server at: 192.168.128.101:1186 Waiting for completed, this may take several minutes Node 3: Backup 1 started from 1 has been aborted. Error: 1350 Backup failed * 3001: Could not start backup * Backup failed: file already exists (use 'START BACKUP <backup id>'): Temporary error: Temporary Resource error |
設定 Backup ID 為 4 後,備份成功。
| [root@centos1 ~]# ndb_mgm> start backup 4 Waiting for completed, this may take several minutes Node 3: Backup 4 started from node 1 Node 3: Backup 4 started from node 1 completed StartGCP: 103 StopGCP: 106 #Records: 2056 #LogRecords: 0 Data: 50788 bytes Log: 0 bytes |
(3) 資料庫還原測試
資料庫還原步驟
a.修改config.ini,再其追加個[mysqld],否則還原會出現 No free node id found for mysqld(API) 錯誤
(上面的 config.ini 開了 4 個 [mysqld],還有兩個未用,所以步驟 a 可跳過)
b.執行 ndb_mgm -e shutdown 停止 ndb_mgmd 和 ndbd
c.每台 MGM 都執行 ndb_mgmd --initial (在 config.ini文件目錄下執行此命令),讓新增的[mysqld]生效
d.執行 ndbd --initial (有幾個節點,執行此命令幾次,必須把資料庫中內容清空)
e.在 Data Node 上執行ndb_restore -c mgmd -n node_id -m -b backup_id -r [backup_path=]/path/to/backup/files
例如 ndb_restore -n 3 -b 1 -r /var/lib/mysql-cluster/BACKUP/BACKUP-1/
執行 ndb_mgm -e shutdown 停止 ndb_mgmd 和 ndbd
| [root@centos1 ~]# ndb_mgm -e shutdown Connected to Management Server at: 192.168.128.101:1186 2 NDB Cluster node(s) have shutdown. Disconnecting to allow management server to shutdown. |
| [root@centos2 ~]# ndb_mgm -e shutdown
Connected to Management Server at: 192.168.128.101:1186
2 NDB Cluster node(s) have shutdown.
Disconnecting to allow management server to shutdown
|
接下來每台 MGM 都執行 ndb_mgmd --initial (在 config.ini文件目錄下執行此命令),讓新增的[mysqld]生效
| [root@centos1 ~]# cd /var/lib/mysql-cluster/ [root@centos1 mysql-cluster]# ndb_mgmd --initial
MySQL Cluster Management Server mysql-5.5.29 ndb-7.2.10
2013-02-08 21:43:25 [MgmtSrvr] WARNING -- at line 19: Cluster configuration warning:
arbitrator with id 1 and db node with id 3 on same host 192.168.128.101
arbitrator with id 2 and db node with id 4 on same host 192.168.128.102
Running arbitrator on the same host as a database node may
cause complete cluster shutdown in case of host failure.
|
| [root@centos2 ~]# cd /var/lib/mysql-cluster/ [root@centos2 mysql-cluster]# ndb_mgmd --initial MySQL Cluster Management Server mysql-5.5.29 ndb-7.2.10 2013-02-08 21:44:24 [MgmtSrvr] WARNING -- at line 19: Cluster configuration warning: arbitrator with id 1 and db node with id 3 on same host 192.168.128.101 arbitrator with id 2 and db node with id 4 on same host 192.168.128.102 Running arbitrator on the same host as a database node may cause complete cluster shutdown in case of host failure. |
| [root@centos1 mysql-cluster]# mysql -e "use db1; show tables;" +---------------+ | Tables_in_db1 | +---------------+ | table1 | +---------------+ |
根據以前經驗, --initial 參數會把資料庫中內容清空,所以資料表應該不見了,但是空的資料庫會留下,但是目前情況不是如此。
還原如果能成功,畫面類似如下:(這是以前舊版測試畫面)
| [root@centos1 ~]# ndb_restore -n 3 -b 1 -m -r /root/BACKUP/BACKUP-1 Nodeid = 3 Backup Id = 1 backup path = /var/lib/mysql-cluster/BACKUP/BACKUP-1 Opening file '/var/lib/mysql-cluster/BACKUP/BACKUP-1/BACKUP-1.3.ctl' Backup version in files: ndb-6.3.11 ndb version: mysql-5.1.39 ndb-7.0.9 Stop GCP of Backup: 0 Connected to ndb!! Successfully restored table `db1/def/table1` Successfully restored table event REPL$db1/table1 Opening file '/var/lib/mysql-cluster/BACKUP/BACKUP-1/BACKUP-1-0.3.Data' _____________________________________________________ Processing data in table: sys/def/NDB$EVENTS_0(3) fragment 0 _____________________________________________________ Processing data in table: mysql/def/NDB$BLOB_4_3(5) fragment 0 _____________________________________________________ Processing data in table: db1/def/table1(7) fragment 0 _____________________________________________________ Processing data in table: sys/def/SYSTAB_0(2) fragment 0 _____________________________________________________ Processing data in table: mysql/def/ndb_schema(4) fragment 0 _____________________________________________________ Processing data in table: mysql/def/ndb_apply_status(6) fragment 0 Opening file '/var/lib/mysql-cluster/BACKUP/BACKUP-1/BACKUP-1.3.log' Restored 0 tuples and 0 log entries NDBT_ProgramExit: 0 - OK |
再次檢查 db1 資料庫中,應該可以看到還原的 table1。
如果不用 --initial 把資料庫內容清空,還原會失敗 (本次的情況)
| [root@centos1 mysql-cluster]# ndb_restore -n 3 -b 1 -m -r /root/BACKUP/BACKUP-1 Nodeid = 3 Backup Id = 1 backup path = /root/BACKUP/BACKUP-1 Opening file '/root/BACKUP/BACKUP-1/BACKUP-1.3.ctl' File size 20344 bytes Backup version in files: ndb-6.3.11 ndb version: mysql-5.5.29 ndb-7.2.10 Stop GCP of Backup: 589 Failed to initialize consumers NDBT_ProgramExit: 1 - Failed |
--------------------------------------------------------------------------
八、防火牆
設定防火牆在開機後自動啟動
chkconfig iptables on
修改防火牆設定檔案
vim /etc/sysconfig/iptables
在適當位置增加下面規則
-A RH-Firewall-1-INPUT -s 192.168.128.102 -p tcp --dport 1186 -j ACCEPT
重新啟動防火牆載入規則
service iptables start
或直接下命令增加規則 (立刻生效,但重新啟動後會消失)
在 192.168.128.101 執行
iptables -A RH-Firewall-1-INPUT -s 192.168.128.102 -p tcp --dport 1186 -j ACCEPT
在 192.168.128.102 執行
iptables -A RH-Firewall-1-INPUT -s 192.168.128.101 -p tcp --dport 1186 -j ACCEPT
或在兩台都執行
iptables -A RH-Firewall-1-INPUT -p tcp --dport 7789 -j ACCEPT
執行下面命令將設定存到 /etc/sysconfig/iptables,讓防火牆重新啟動後生效
iptables-save
(完)
---------------------------------------------------------------------------
附錄1:設定主機名稱
在 Server A 上執行 uname -n 或 hostname 可查詢目前的主機名稱是甚麼
| [root@server1 ~]# uname -n centos1 |
| [root@server1 ~]# hostname centos1 |
| [root@server1 ~]# hostname centos2 |
另外 vim /etc/hosts,增加
| 192.168.128.101 centos1 |
(完)
沒有留言:
張貼留言